Content may contain affiliate links. When you shop the links, I receive a small commission at no cost to you. Thank you for supporting my small business.

These DIY cardboard gift tags add a natural look to Christmas gifts and take only a few minutes to make with any cardboard you may have on hand.

Every Christmas, without fail, I forget to buy gift tags. For some reason, I always assume I have some left over from the one year that I did remember to stock up. Because supplies of everything are low in stores this year, when I finally dragged myself to Target at the last minute, they were already completely sold out.
So, this holiday season I tried making my own DIY gift tags! I adorned my Christmas presents with them and they were a hit. You’ll have so much fun, save money, and enjoy adding a personal touch to your holiday gifts.
How to Make Your Own Cute DIY Christmas Gift Tags
I knew I wanted natural style gift tags, something with that sort of Scandinavian, minimalist feel to them. And so, my cardboard cut-out Christmas tags were born!
These pretty gift tags are completely free to make! Isn’t that awesome? And I honestly think they look better than so many of the tacky pre-made tags available in stores.
You don’t really need a tutorial because these are beyond simple, but I’ll give it to you anyways! The best thing about these is you really can’t mess it up.
Watch Me Make Them!
Watch this reel from my Instagram account to see just how easy it is to make these gift tags! Then follow me for lots of other great ideas!
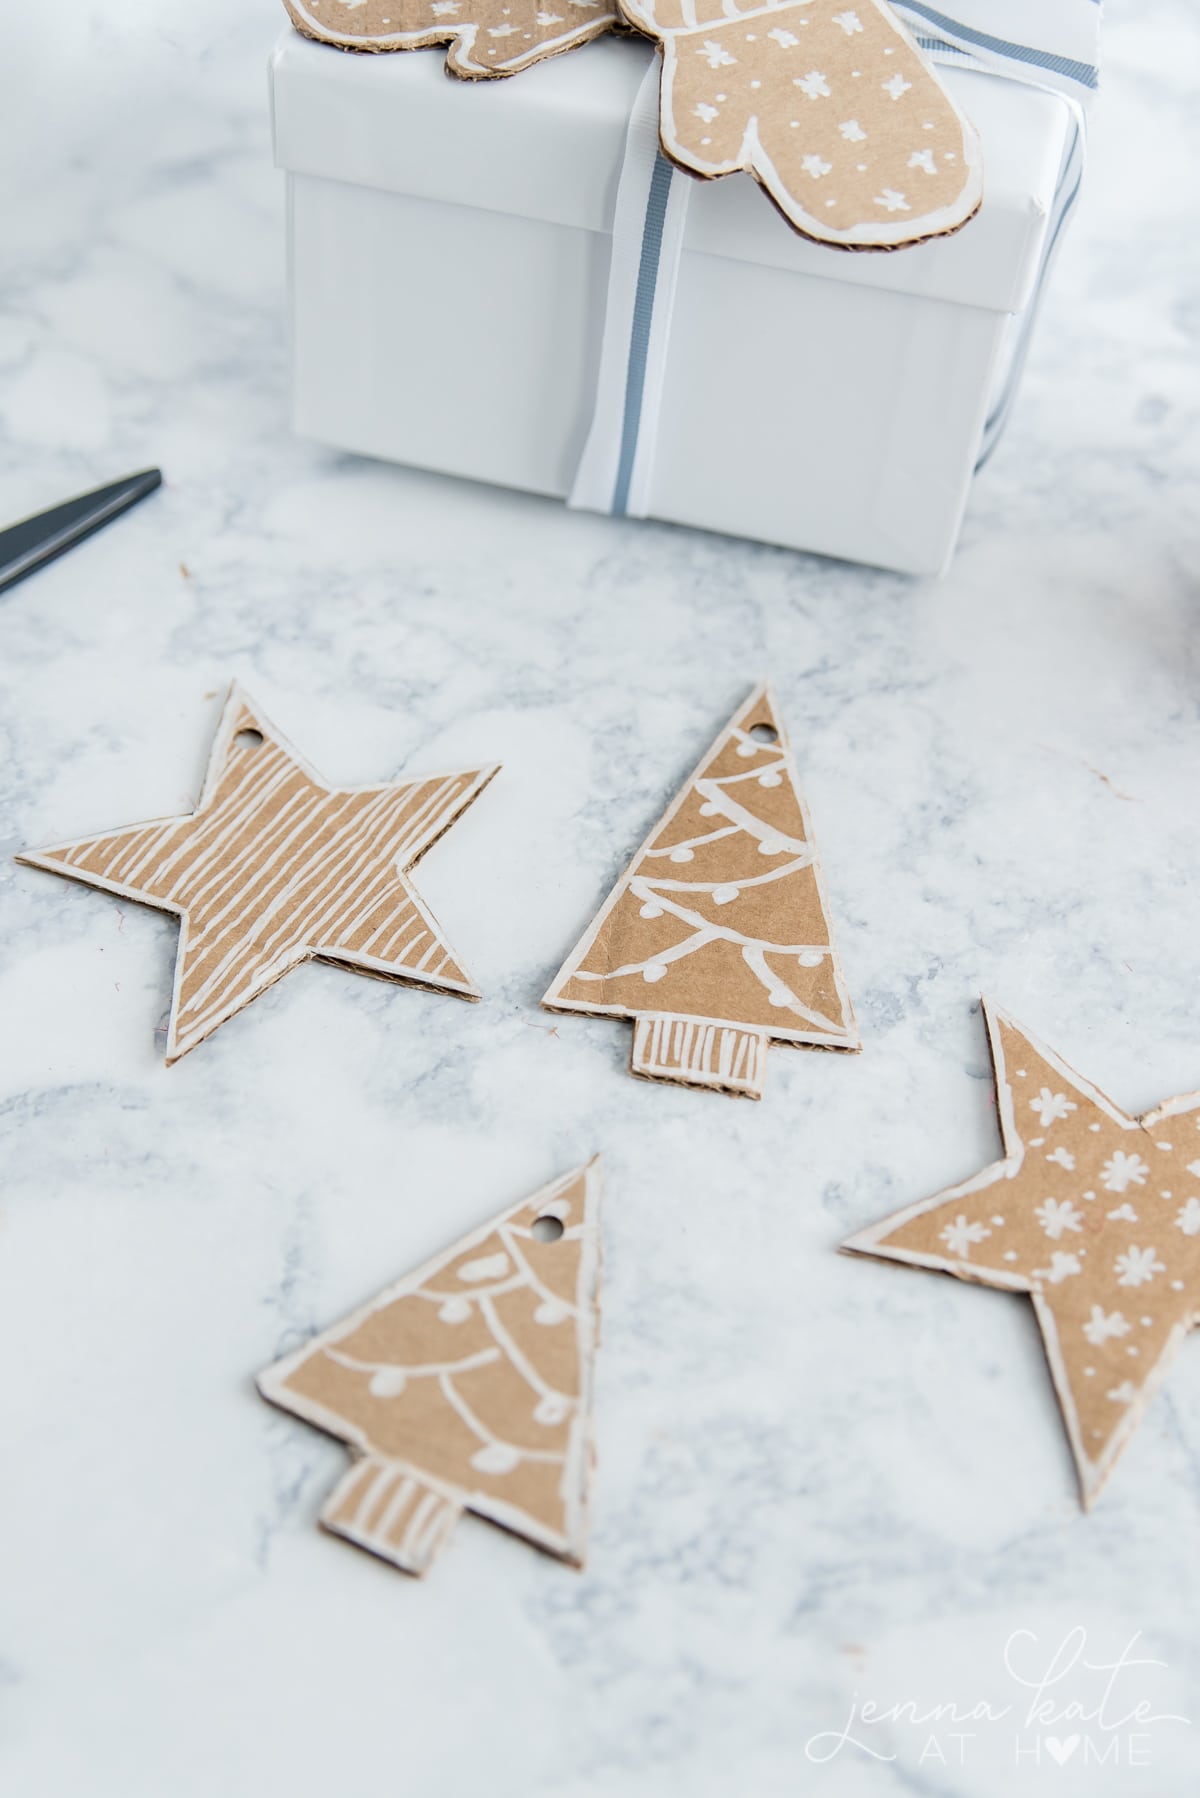
1. Draw the Cutout Design
First, freehand your design. Whether you choose to shape ornament gift tags, candy canes, mittens, Christmas trees, or snowflakes, you can most likely create the design without any additional help.
If you’d prefer to use a stencil or free template though, that is fine too. Cookie cutters work great as an outline and are a free pattern to use.
2. Cut Out the Gift Tag
Using a pair of sharp scissors cut out the different tags according to the designs you just established.
It’s okay if they look a little jagged, it adds to the homemade touch!
3. Decorate
Now, it’s time to decorate! I used white chalkboard marker but you can use whatever you have on hand. Paint, markers, fabric scraps, and stickers all will spruce up your gift tag. I’d look through your craft room, if you have one, to see what you can find. You can create intricate designs or do simple polka dots. It’s totally up to you!
Don’t forget to leave room on the back to write the gift recipient name, but you can also add the words “Merry Christmas” in beautiful calligraphy if you are skilled in that department.
A few other fun ideas might include drawing Santa Claus, cutting out figures or shapes from your favorite wrapping paper to glue on, or attaching tiny bits of greenery.
RELATED: DIY Advent Calendar
4. Punch a Hole
The last step is to use a hole punch and cut out a place to attach ribbon. Then you’ll be ready to address the gift and attach to the present.
You can find either string, ribbon, or twine to attach the gift tags to each present. Personally, I love using a festive color like red or green for the holidays!

Non-Cardboard Gift Tag Ideas
I love this DIY project because you can swap out the cardboard for all sorts of things. Using white cardstock you can follow identical steps for a simpler gift tag option.
Or, scrapbook paper, a piece of fabric, an old gift bag, table place cards, and other forms of sturdy paper can be cut into whimsical Christmas shapes and used as Christmas gift tags. There’s no need to spend a fortune when you can make free gift tags quickly.
If you don’t have cardboard on hand (you must not be an online shopper like me!) try one of these alternatives to still create your own gift tags for each family member this year.
Final Thoughts
Now, are you ready to get your creative juices flowing and whip up a batch of handmade gift tags? You’ll use them all season long, I promise!

DIY Christmas Cardboard Gift Tags
Materials
- Cardboard
- White markers
Tools
- Scissors
- Hole punch
Instructions
- Cut out desired shapes on cardboard
- Carefully cut out the shapes with a scissors
- Draw an outline around each shape and decorate with stripes, stars, dots or anything you please!
- Punch a hole in the top and string ribbon or decorative string through.


I am sitting here right now in a mound of boxes for recycling. Going to run to store for white marker!!!!! Fantastic idea – – – thank you!
Hi Jenna, I love this idea!! I have so many boxes waiting to recycle, now I can use them instead. Just wonderful. Thank you! Julie
Yay! I’d love for you to share with me on Instagram if you do!