Yield: 1 desk and 2 shelves
DIY Floating Desk and Shelves
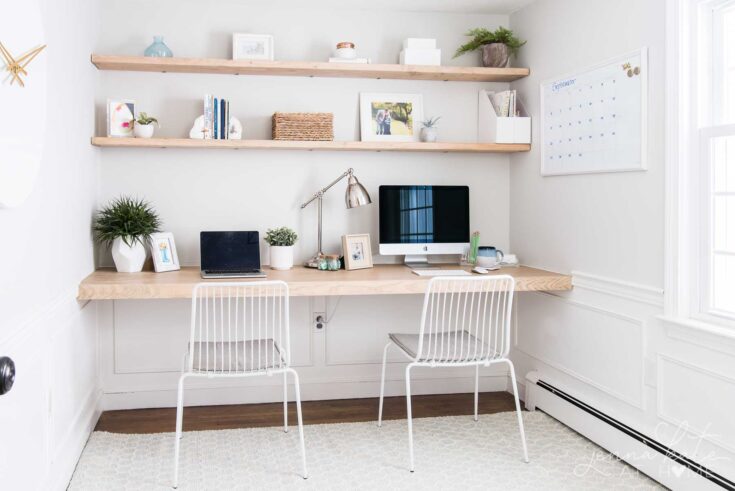
A simple and modern DIY floating desk that is a simple and easy to build solution to create a home office or homeschooling space in any nook in your home.
Active Time
5 hours
Additional Time
1 day
Total Time
1 day 5 hours
Difficulty
Intermediate
Estimated Cost
$200
Materials
- 2 x 2 furring strips (to build the support frame)
- 3/4" x 2ft white oak plywood (for the desk top)
- 1x 3 select pine (for the desk front)
- 3 inch wood screws (to attach support frame to the studs)
- (2) 2 x 10's (for the wall shelves)
- 4 boxes of 1.5 inch angle braces (to hang the shelves)
- 2 inch wood screws (to attach angle brackets to shelves)
- Wood filler
- Caulk
- Clear furniture wax
- Drill with hole saw attachment
- 2 inch white desk grommet
Tools
- Miter Saw (for all the cuts)
- Kreg Jig (for the pocket holes)
- Stud Finder
- Brad Nailer
- Sander
Instructions
How to Make The Floating Desk and Shelves
- Mark the studs in the wall. Everything will need to be screwed directly into the studs for the desk and shelves to be secure.
- Build the frame to support to desk top. I started by cutting the back and front pieces to size, then each smaller pieces. Since the desk top was going to be 2 feet deep, I made sure that the total depth of the back piece + the small pieces + the front piece equaled 24 inches exactly.
- Since I was using 2 x 2 boards, that meant the back piece was 1.5 inches, the front piece was 1.5 inch which left me needing 21 inches for the in-between smaller boards. Each of 21 inch pieces of wood was cut to size and then drilled on both ends to accommodate a pocket hole using my Kreg Jig. You could also pre-drill holes and just screw directly, but the pocket holes are much more secure.
- Attach the back piece of the wood frame using screws long enough to go through the 2 x2 wood. I used 3 inch screws. Then, start attaching each of the brace pieces, starting with the sides. We didn't have any studs on the sides to attach to and the desk is still secure. Finally, attach the front piece so that the frame is built. (Alternatively, you can build the frame and then install it on the wall. However, if you're dealing with a large space like mine, it would be very cumbersome.)
- Measure the top of the desk and cut the oak plywood. Place the plywood down on top of the floating frame. Secure around the top using brad nails.
- Attach the front trim 1 x 3 using brad nails. Then fill any nail holes or seams with wood filler (I used the "natural" color). Be sure to fill the seam where the desk top meets the 1x3.
- Drill a hole in the top of the desk for cables. I used a 2 inch hole saw and then inserted a white cable thing so that it looks neat. (You could also do this prior to installing the desktop, but I wanted to be able to put my computer on top and figure it all out first. )
- Caulk all the way around the edges of the desk where it meets the wall. Cover the surface of the desk with Frogtape first so that the caulk doesn't seep into the grain of the wood.
- Sand the 2 x 10 boards smooth. Stain the wood to match the white oak (see this tutorial more info).
- Determine height of shelves and cut the wood to size. Don't assume that both pieces will be cut exactly the same length. There was 1/8 of an inch difference in the width of my walls between the two shelves.
- Starting with the top shelf, attach the angle brackets to the walls where they will hit the studs, and one on each side (they probably won't get a stud on the sides). The screws that come with the shelves are too small, so you will need to use 1.5 inch wood screws.
- Place the shelf on the brackets and screw the brackets up into the shelves. You can use the screws that came with the brackets for this part.
- Repeat for the bottom shelf.
- Seal both the desk top and shelves with clear furniture wax or matte polycrylic.
- Then all that's left to do is decorate, set up your computer and enjoy!
Notes
The length of the desk can be shortened to accomodate your individual wall. The only difference will be the length you need to cut your boards and the number of angle brackets you will need to support the shelves.
Allow the stain on the shelves to dry overnight or for a minimum of 8 hours before installing or sealing. The clear furniture wax or polycrylic will also need to dry for 24 hours before placing objects on the desk or shelves.