Content may contain affiliate links. When you shop the links, I receive a small commission at no cost to you. Thank you for supporting my small business.

Learn how easy it is to build a simple fireplace surround and mantel from MDF to beef up an existing brick fireplace.
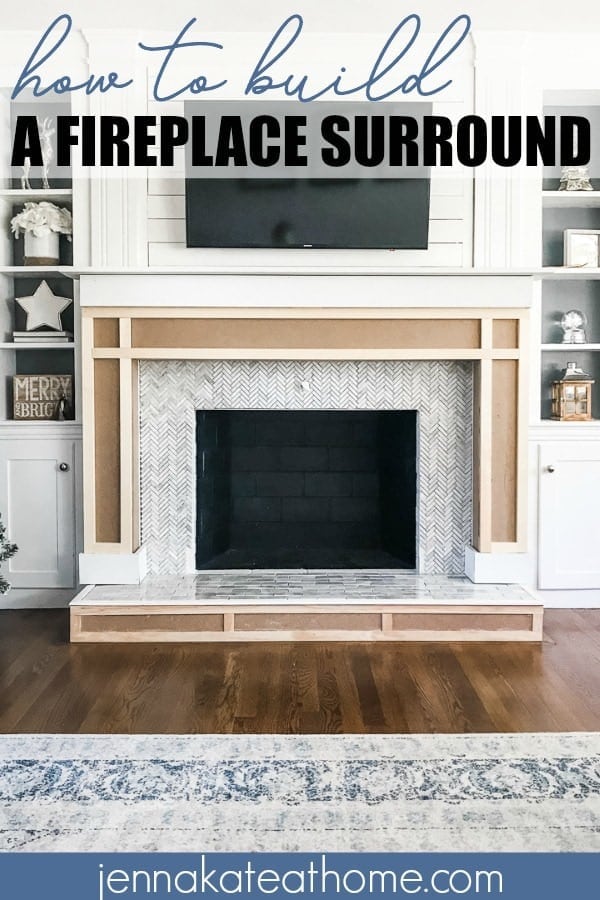
In the first part of my fireplace makeover tutorial, I shared how to tile over a brick fireplace. Today, I’m going to share how to make a fireplace surround and mantel.
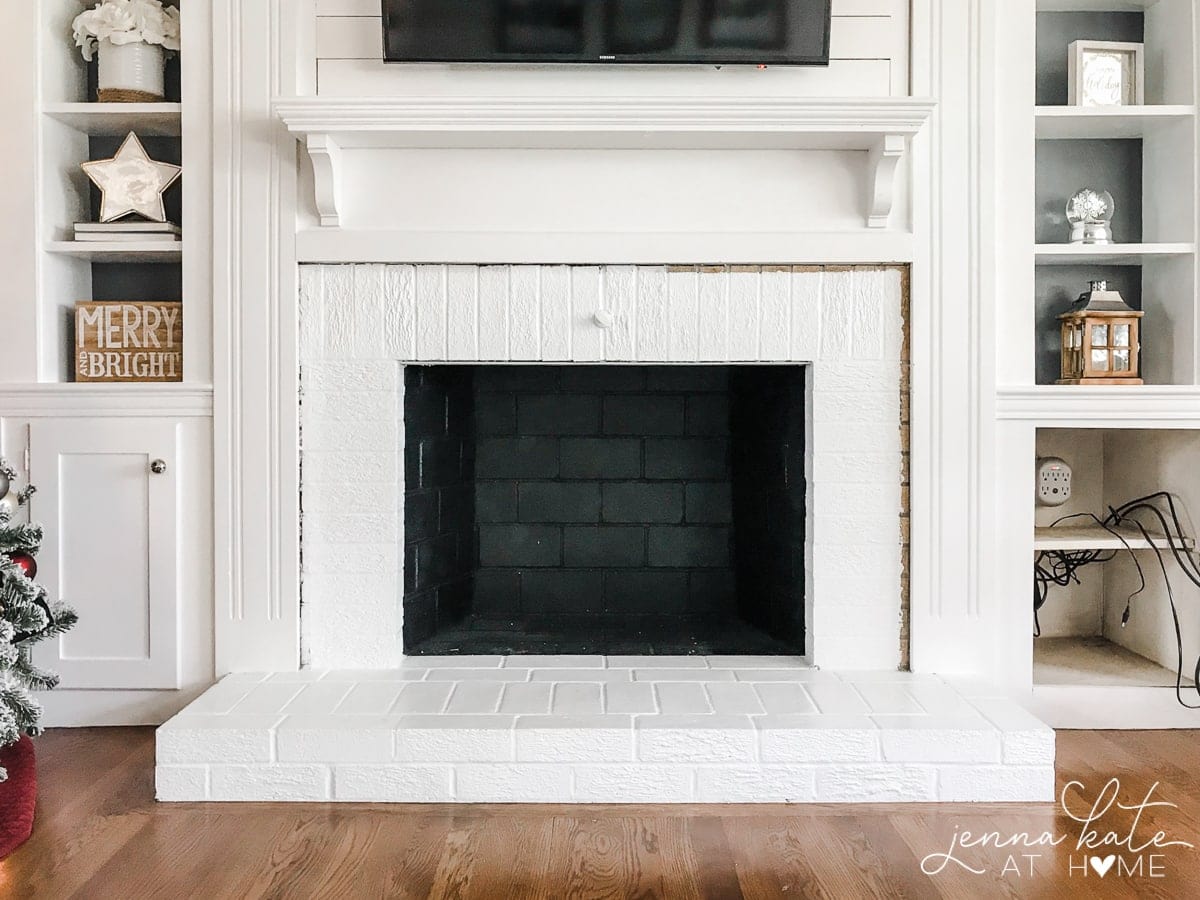
Before we get into the tutorial, here’s what we started with:
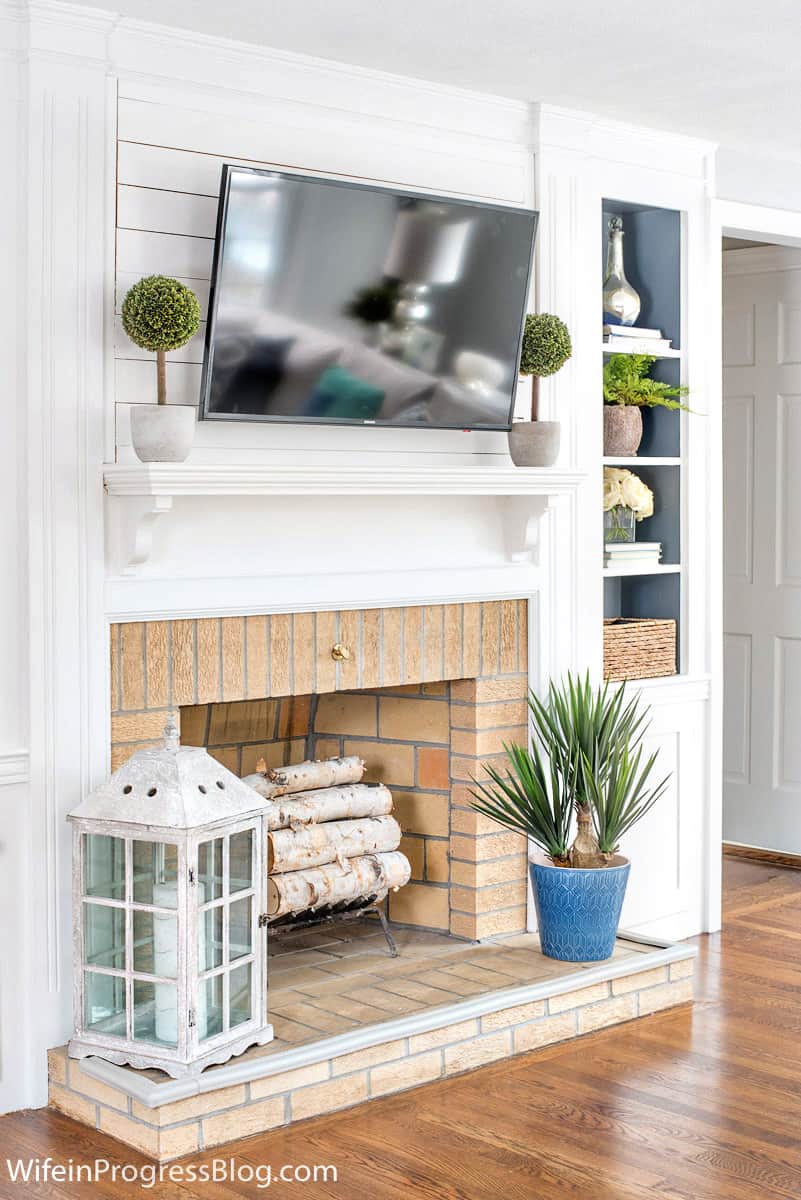
And this in an improvement on what it ORIGINALLY looked like when we moved in….
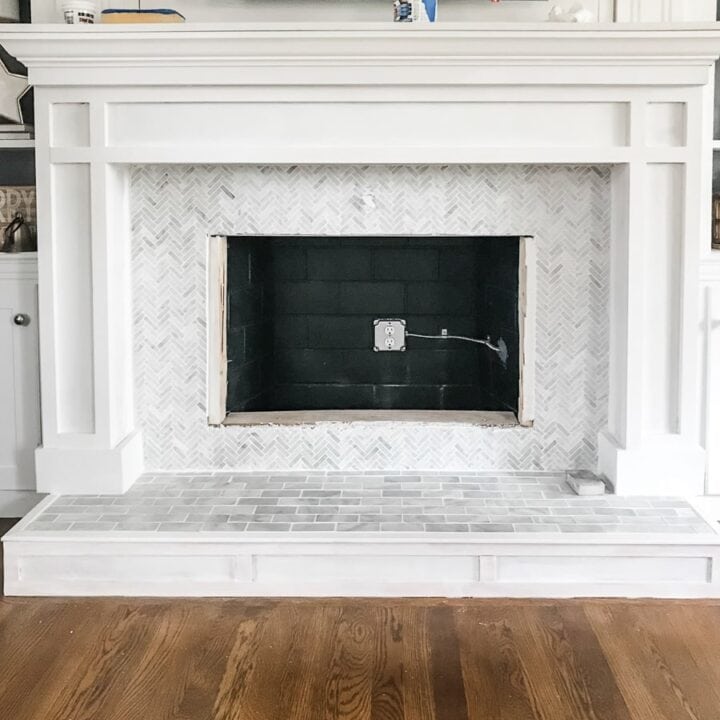
But now we’re here. The mantel (shelf) has been removed and the tile has been laid. Now it’s time to build the surround and make this look like a proper fireplace!

What is a Fireplace Surround?
A fireplace surround is the decorative part that frames the actual fireplace. Think of it like a picture frame but for the flames. It’s made from various materials like stone, tile, wood, or metal. While it serves a safety purpose, it also gives homeowners a chance to show off their style. Depending on the design, a fireplace surround can either be a subtle addition or the main focal point of a room, enhancing the overall look and feel. You can also opt for fireplace built ins on the sides to pair with the surround. This takes the entire project up a notch!
How To Build a Fireplace Surround
When we took the old mantel shelf off we were left with a surface almost completely flush with the wall (one of the main reasons for this makeover).
Before we could tile the hearth, we covered the brick with ¼ inch MDF. We stuck it directly to the brick using some Liquid Nails and used our nail gun on the corners where the MDF met. We didn’t bother mitering the edges and just butted them since we knew it would be covered with trim later on.

We used the same sheet of MDF to cover the sides of the surround and across the top. We measured them to fit what already existed since the built-ins on either side preventing us from going any wider. We secured the MDF to the existing wood surround using our nail gun.

Next, I began to add some of the lattice pieces to the front of the hearth. We started by boxing it out (top piece, bottom piece then left piece and right piece). Finally, we cut the two small vertical pieces that would form the inner boxes.
The lattice pieces are attached mostly with liquid nails but with a few nails in the corners just to make sure they would stay in place. The lattice repeats on the side of the fireplace, too.


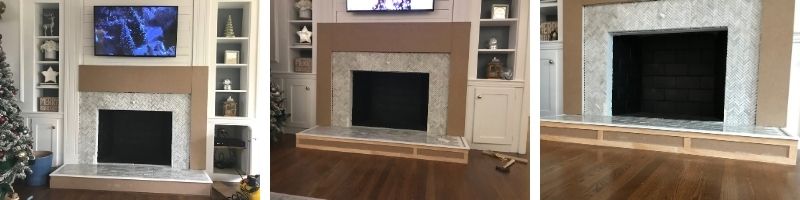
Building The Mantel
At this point we decided to build our mantel before deciding how far out we wanted to build the surround. It was one of those things that we just needed to see in real life and not just on paper.
The mantel itself is a very simple box. We purchased pre-primed 1 x 4’s and started by attaching the back board to the existing wall with our nail gun.
The bottom piece was nail in place and then the side pieces. Finally, the front piece.
No 45 degree angles needed again, since we knew the exposed sides would be covered by crown when we were done.
Note: In hindsight, it would have made more sense to build the box first and THEN install it. If you have a kreg-jig, pocket holes would work great to secure the sides. But our way worked fine in the end.

When we were happy with the box, we attached a 1 x 8 pre-primed board to sit on top and form the actual mantel.

Once the mantel was built, it was easy to figure out how far out we needed the build the rest of the surround.
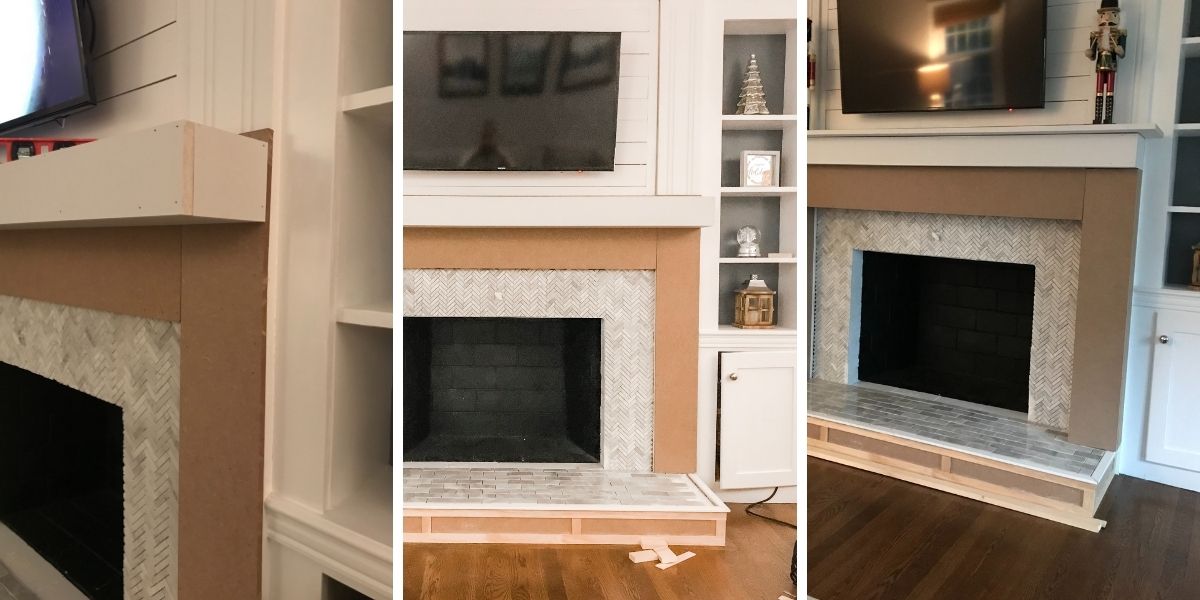
Again, we kind of just boxed it out, this time using 1/2 inch MDF. We attached the side pieces first, then nailed the front piece in.
For reference: our column/vertical pieces are 7 inches wide, with a depth of 6.5 inches. Yours may need to be bigger or smaller, but that may help you figure out what you need.
Then we added 1 x 4 pieces to the bottom of the vertical sides to create some depth. These pieces were cut at a 45 degree angle to create a clean, mitered edge.
By the way, we found the MDF very messy to work with (we are STILL cleaning up saw dust a month later). I’m not sure our circular saw was up to the job – a table saw would have made cleaner cuts – and the pieces were large so cutting them with our miter saw was a no-go.
SO, we just butted the edges and figured some spackle and sanding would help hide the fuzzy raw edges of the MDF (note: they did! The sides came out perfectly smooth and painted like a dream!)
Next up we worked on finishing the shadow boxes using 1×2’s. We only used the thin pieces of lattice for the hearth, they looked too wimpy on the main surround, so we chose 1×2’s for more dimension.
We always do the perimeter boxes first and then full in with the little pieces. Doing it that way makes the cuts a lot quicker. At this point the whole design really started to come together.

Fitting the Electric Fireplace
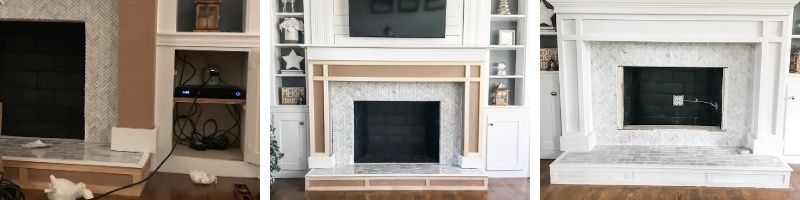
In order for the electric fireplace to sit into the existing fireplace surround, we needed to build a box for it to sit in.
The particular electric insert that we purchased screwed in on the sides only, so we decided to only do 3 sides to our box – left, right and bottom.
The bottom piece needed to be raised up from the ground enough so that to top of the insert would align with the top of the opening and cover an imperfections in the tile right around the edge.
We did the math and figured all that out, then screwed the wood into the brick with some masonry screws and as well as liquid nails.

I forgot to take a photo before we attached the backer board to the wood but you get the idea, right?
At this point, the electrician had finally come and installed the outlet inside the fireplace so I was able to go ahead and finish tiling. P.S. Did you notice the little red hammer? My kids love to help and have kiddy versions of ALL our tools!
We attached some crown moulding the front using various YouTube tutorials to help us cut the mitered edges.
The first piece of crown we bought was 4 ½ inches and too large. Even though it fit on the front under the mantle top, we couldn’t get the edges to meet, so we had to go down to a 3 ½ inch piece.

Finishing Touches
Next came the dirty part – lots of grouting, cleaning, spackling, caulking and sanding.
I sealed all the fuzzy edges of the MDF with a light coat of spackle, let it dry and sanded it with fine grit sandpaper. All the nail holes will filled with spackle and sanded once dry.
Finally, all the seams were filled with caulk. I made sure that the wood had no imperfections and was very smooth before priming it with 2 coats of my favorite primer and sealer. This stuff completely seals the wood so that you don’t ever need to worry about bleed-through.

I lightly sanded between each coat of primer to ensure that I was keeping the surface as smooth as possible. I allowed the primer to dry for 24 hours and then applied 2 coats of Sherwin Williams Extra White in a satin finish.
Then FINALLY, after what seemed like an eternity and a whole lot of late nights, we installed the electric fireplace insert.


I was SO excited for it to be done that I had all my Christmas decorations back up before I took photos. Isn’t it beautiful though?
What kind of wood is best for a fireplace surround?
MDF or oak is a great choice if you’re building a DIY fireplace surround and mantel. Both are easily painted, depending on your preferences.
Final Thoughts
In the end, we pretty much built this entire fireplace mantel and surround from scratch. But I have to say it was worth it.
Our living room has been completely transformed! Our new DIY fireplace surround is proportional, and substantial and fits our space. It wasn’t the most difficult DIY project but it certainly was a little frustrating at times (I’m looking at you crown molding!) and more than a few swear words were uttered.
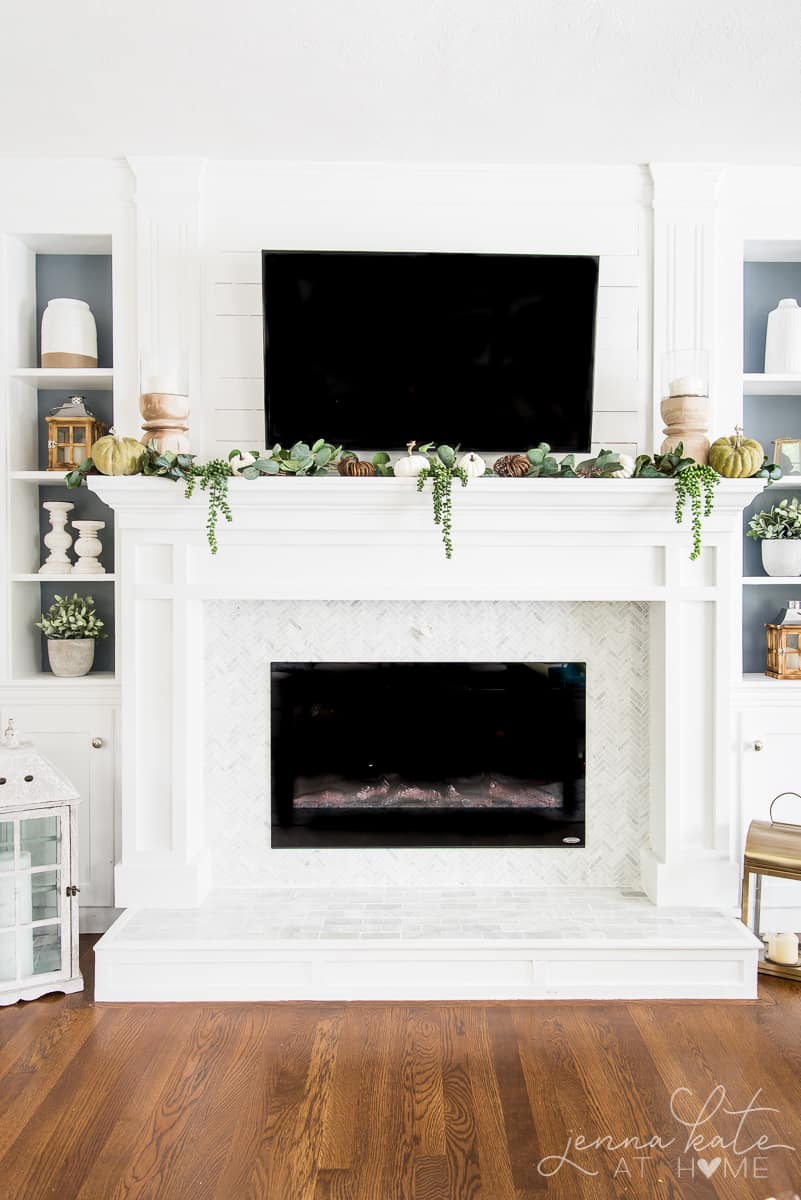
We’re so happy with how it turned out and we very pleased that we DIYed the entire thing ourselves and saved a lot of $$ as a result!
How to Build a Fireplace Surround and Mantel
Materials
- Sheet of ¼ inch MDF
- Sheet of ½ inch MDF
- 1 x4 pre-primed boards (6ft)
- 1 (one) 1 x 8 pre-primed board (length of mantel top)
- 1 x 2 boards (2 - 3, 8ft boards)
- Lattice Trim
- wood screws
- brad nails
- liquid nails
- tape measure
- level
Tools
- Circular or Table Saw
- Miter Saw
- Nail Gun
Instructions
Building The Base of the Surround
- Cover the brick hearth with ¼ inch MDF using Liquid Nails. Use a nail gun on the corners where the MDF meets. The corners don't need to be mitered, just butted together since they will be covered by trim in a later step. If you are tiling, this step should be completed prior to tile being installed.
- Use additional MDF to flank the sides of the fireplace, to create two columns, then another piece across the top. The width of these pieces will vary depending on the dimensions of what you're working with.
- Add lattice pieces to the front of the hearth. Start by boxing it out (top piece, bottom piece then left piece and right piece). Finally, cut the two small vertical pieces to form the inner boxes.
- The lattice pieces are attached mostly with liquid nails but with a few nails in the corners just to make sure they would stay in place. The lattice repeats on the side of the fireplace, too.

Building The Mantel
- We chose to build our mantel box before finishing the surround, so that we could visually see how far we wanted it to come out.
- The mantel itself is a very simple box. There's two methods to making it. The first is to build the box and then screw it to the wall with heavy duty wood screws. The second method is to use a kreg jig and pocket holes (preferred method). The second method, in my opinion, is more secure.
- We purchased pre-primed 1 x 4's and started by attaching the back board to the existing wall with wood screws.
- Add a support piece in the middle, then on both sides, by screwing wood screws through the pocket holes. Then nail the bottom piece to all the supports, and finally the front piece. (we did not do the middle support as everything seemed sturdy enough, so it's optional).
- No 45 degree angles are needed, since the the exposed sides will be covered by crown when we were done.
- When the basic box is installed, the 1 x 8 board for the mantel sits directly on top. Nail it down all around. It's important that this piece sits out far enough from the box below it that crown molding can be attached. You may want to play around with whether a 1x 8 or 1 x 10 works best for the type of crown you're planning to use.

Finishing the Surround
- Once the mantel is built, it's easy to figure out how far to build out the rest of the surround.
- Box the side columns in, using ½ inch MDF. We attached the side pieces first, then nailed the front piece in.
- Then add 1 x 4 pieces to the bottom of the vertical sides to create some depth and act almost like a piece of base crown. These pieces were cut at a 45 degree angle to create a clean, mitered edge.
- Add shadow boxes with 1 x 2's to both vertical sides and the piece under the mantel. Start with the perimeter boxes first and then fill in with the little pieces. Doing it that way makes the cuts a lot quicker.
- Attach a piece of crown directly under the mantel ledge.The piece we used was 3 ½ inches. You may want to watch a YouTube tutorial to learn how to miter the edges of crown, it's a little tricky!
Notes
How much wood will vary depending on the size of mantel and surround you choose to build. We were constrained by what was already there, so we built to those dimensions. We also only have ceilings just over 7 feet, so the height has to be proportional to that.


Can you tell me the dimensions of your fireplace? I am building one from scratch and love the look of yours.
Hi can you tell me the dimensions of your fireplace bc I am building one from scratch? Like how wide and tall it is. All that kind of stuff. I really like what you’ve done & everyone I show loves it too!
How did you hang the tv over the fireplace? I suppose there would be no studs behind due to the chimney
There are studs directly in front where the wood was framed out and attached.
Stunning! What did you use for the border around the tile on top of the hearth?
Thanks, great job. Looking at doing this too. Also, what do you use under your Christmas Tree, is that a basket?
yes! a basket!
What is the blue/grayish accent color you used on the recessed areas?
Hi! It’s Sherwin Williams Serious Gray