Content may contain affiliate links. When you shop the links, I receive a small commission at no cost to you. Thank you for supporting my small business.
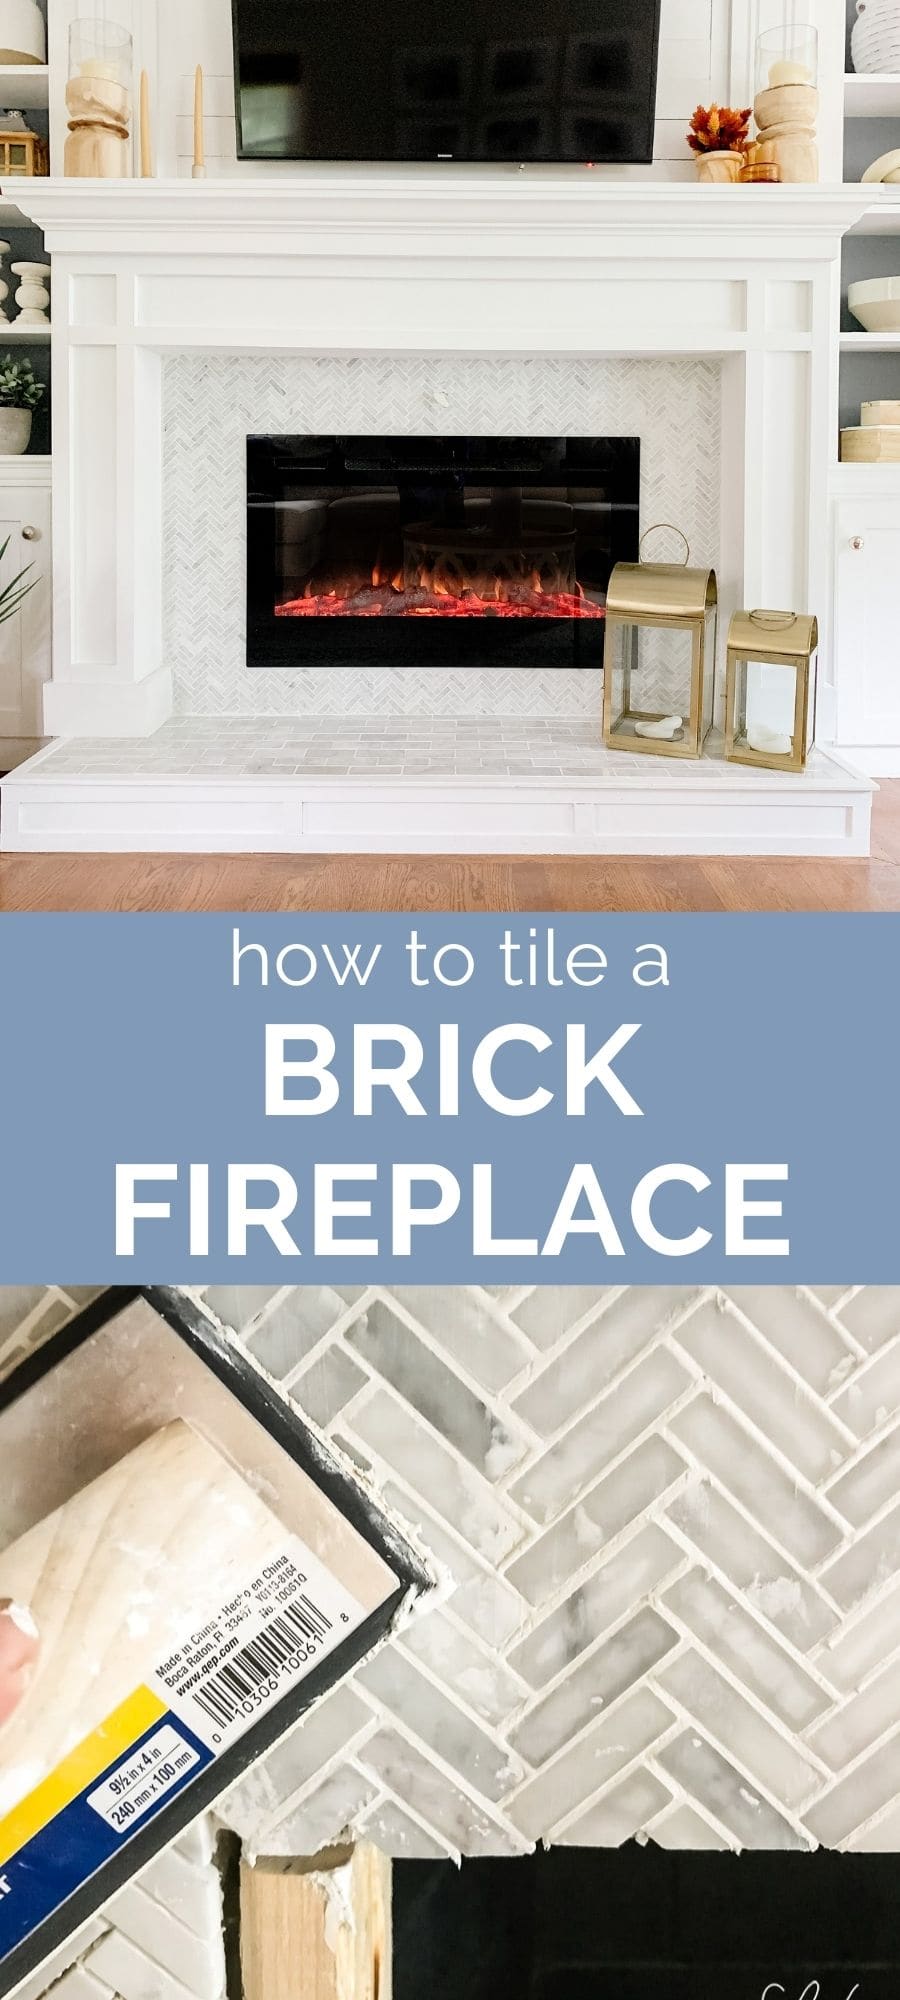

Can you tile over a brick fireplace? Yes! Tiling over brick (even painted bricked!) is an easy DIY project as long as your brick is in good condition. Learn how to do it yourself with this simple tutorial.
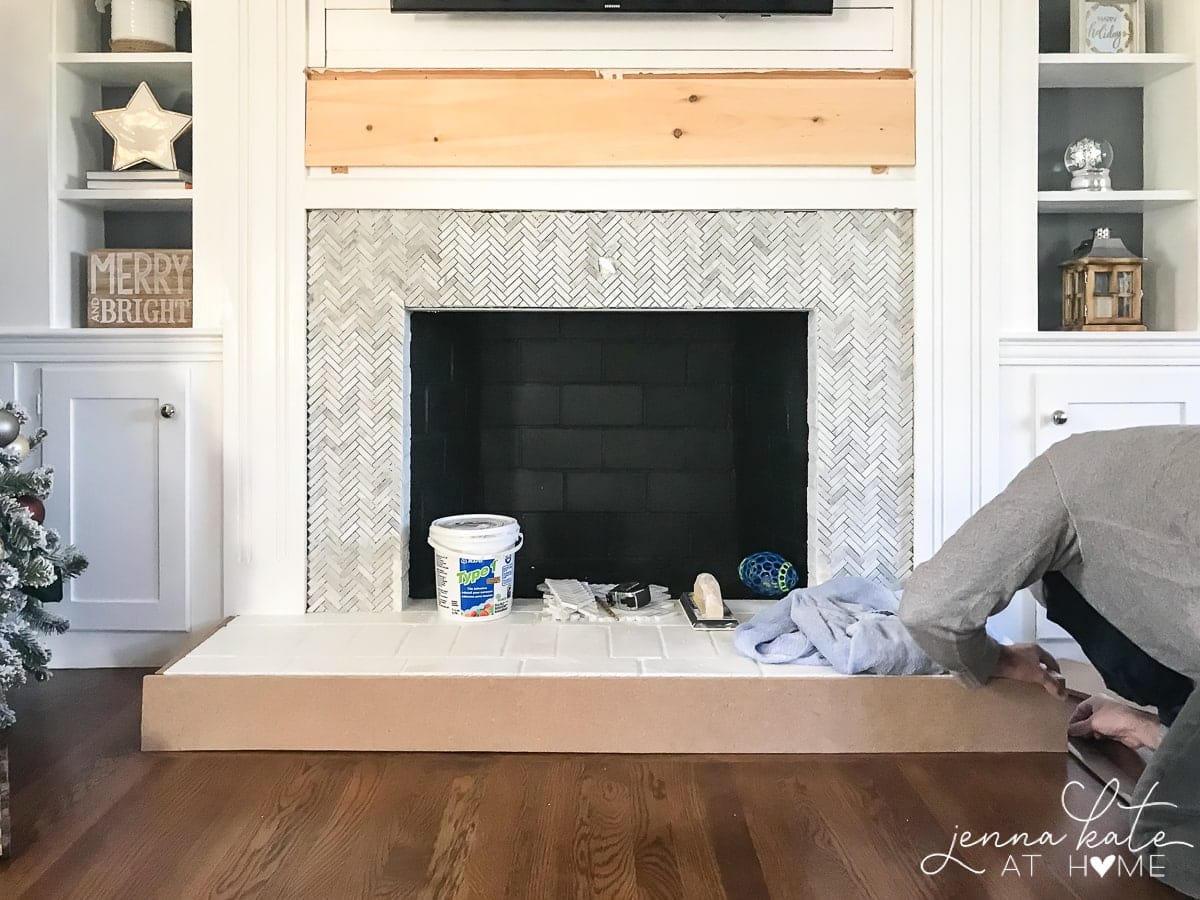
If you’ve been following this entire fireplace makeover process, let me remind you of what we started with:
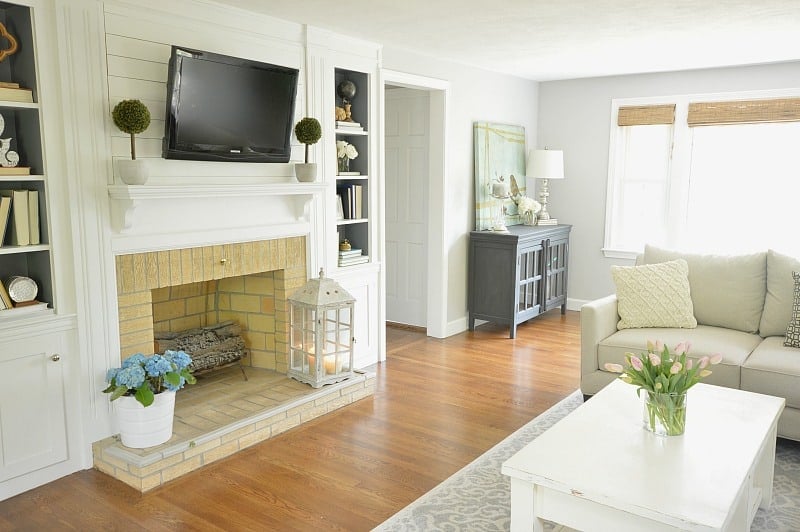
More recently, I painted the brick white and it was a huge improvement
But the “mantel” that was in fact a shelf was too narrow for the surround and drove me crazy. I have such a thing about symmetry and proportion and it really did make me cuckoo looking at it every day. PLUS, I dreamed of beautiful shadow boxes and marble tile…so I we came up with a plan to make it happen.
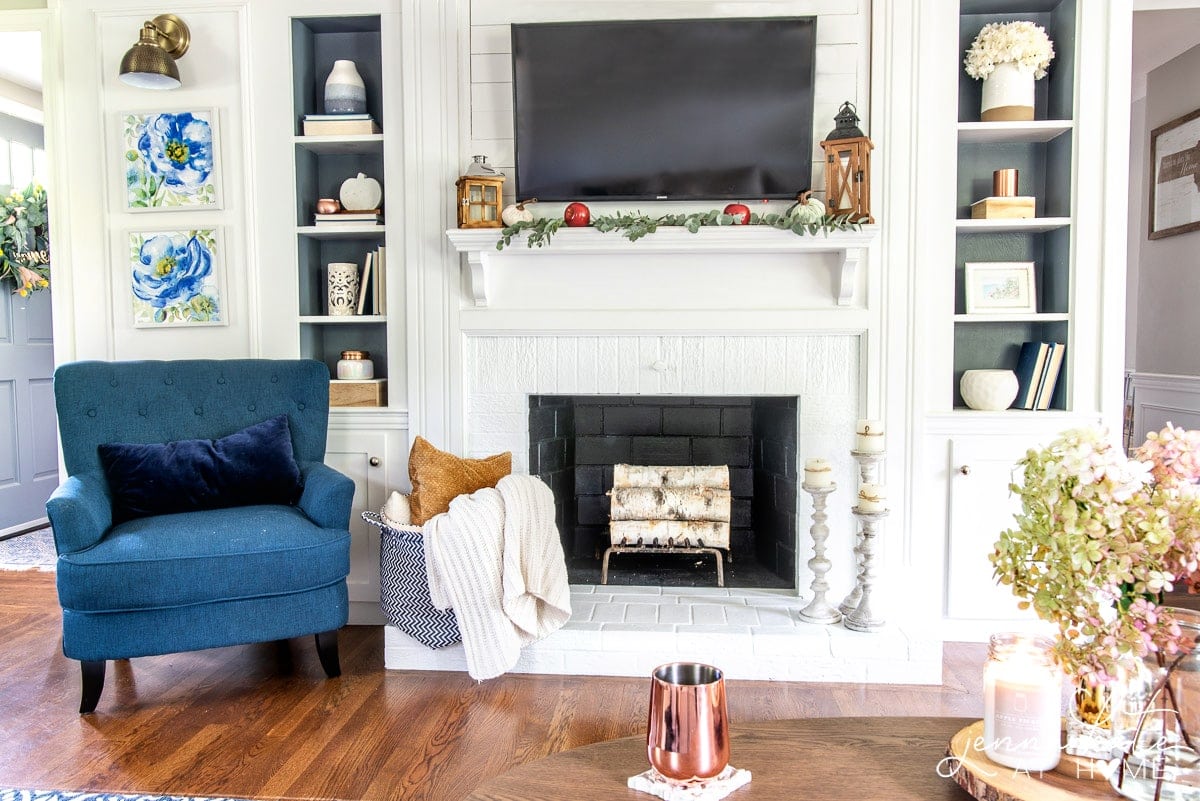
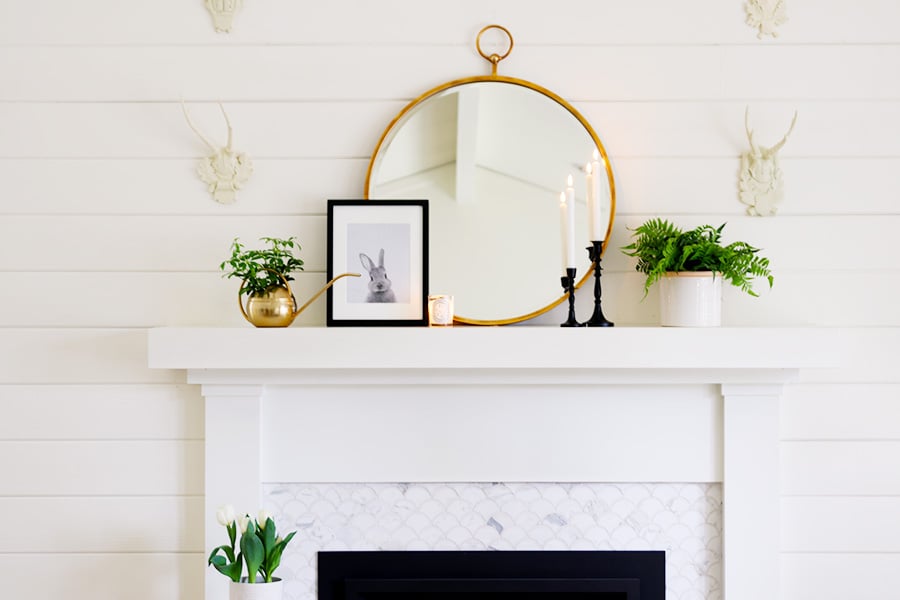
And this is where we ended up.

Now let me walk you through all the steps that got us here!
The Design Plan
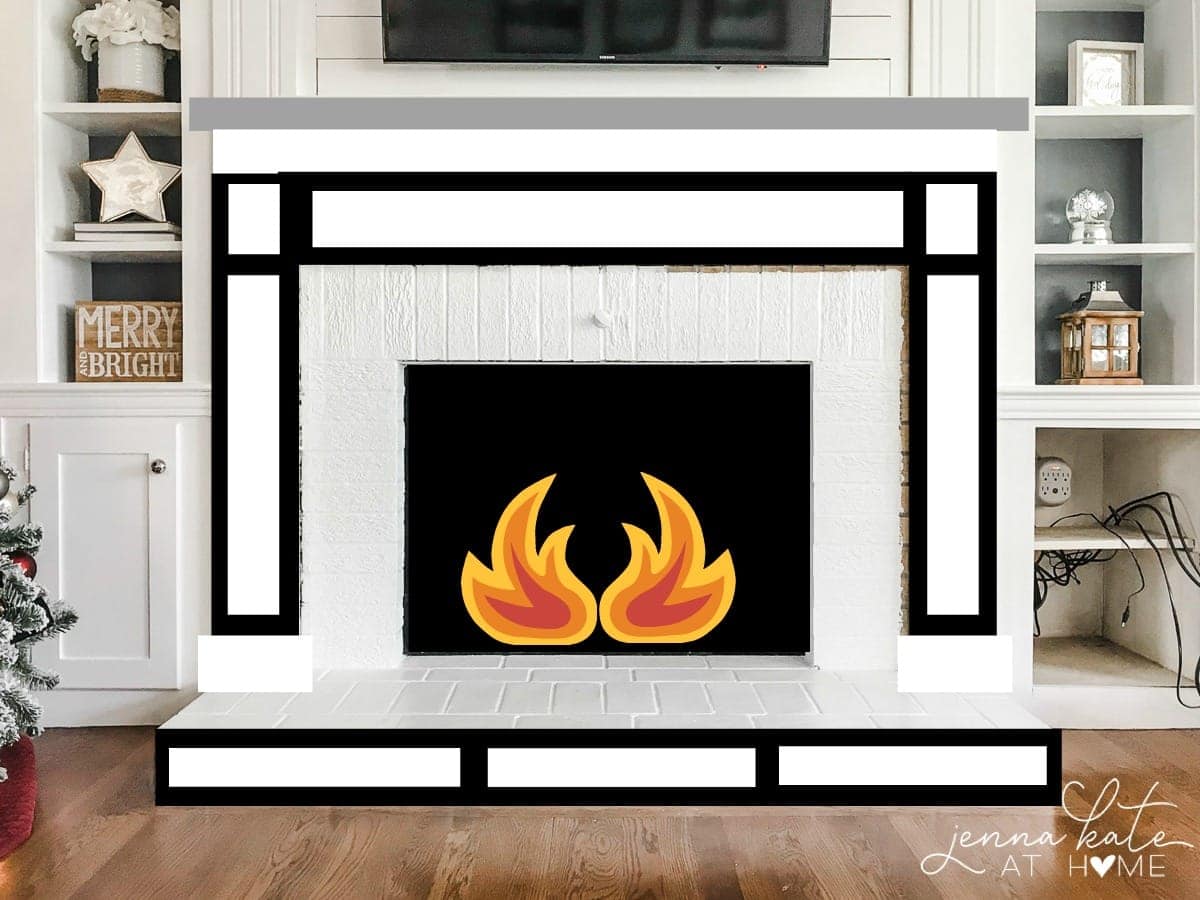
OK – so I originally drew this by hand but it is such a mess now since it’s full of scribbles and measurements that I thought I would just recreate it digitally for you. The plan for the surround and the mantel was very simple.
- Build out the vertical sides of the surround that they they were no longer flush with the wall and could thus support a deeper mantel
- Widen the mantel so that it hung over each side of the surround by 3 inches
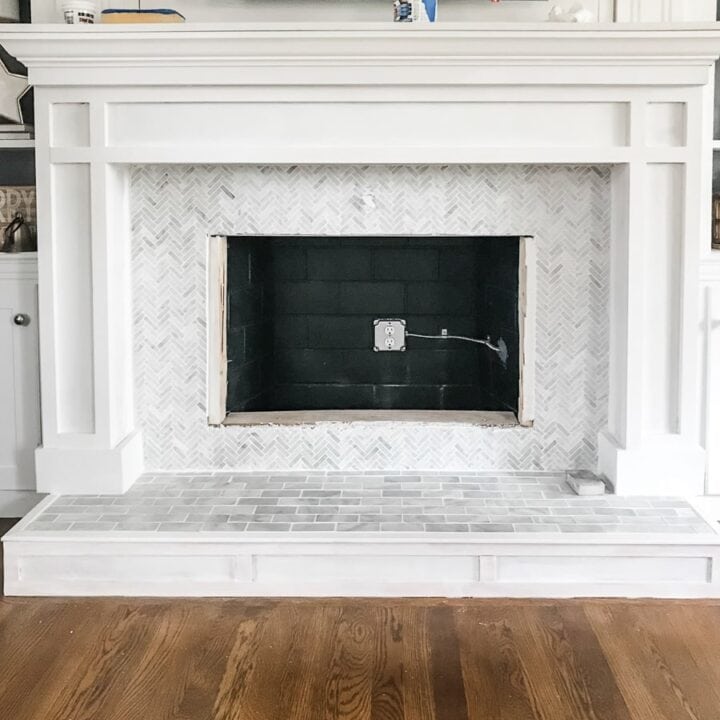
- Add shadow boxes vertically and horizontally on the surround as well as on the front and sides of the hearth.
- Tile all the brick.
- Install outlet inside fireplace to accommodate new electric insert.
- Create a box for the electric fireplace to rest on (and be screwed into).
The Process
Phase 1: Demo. Sort of.
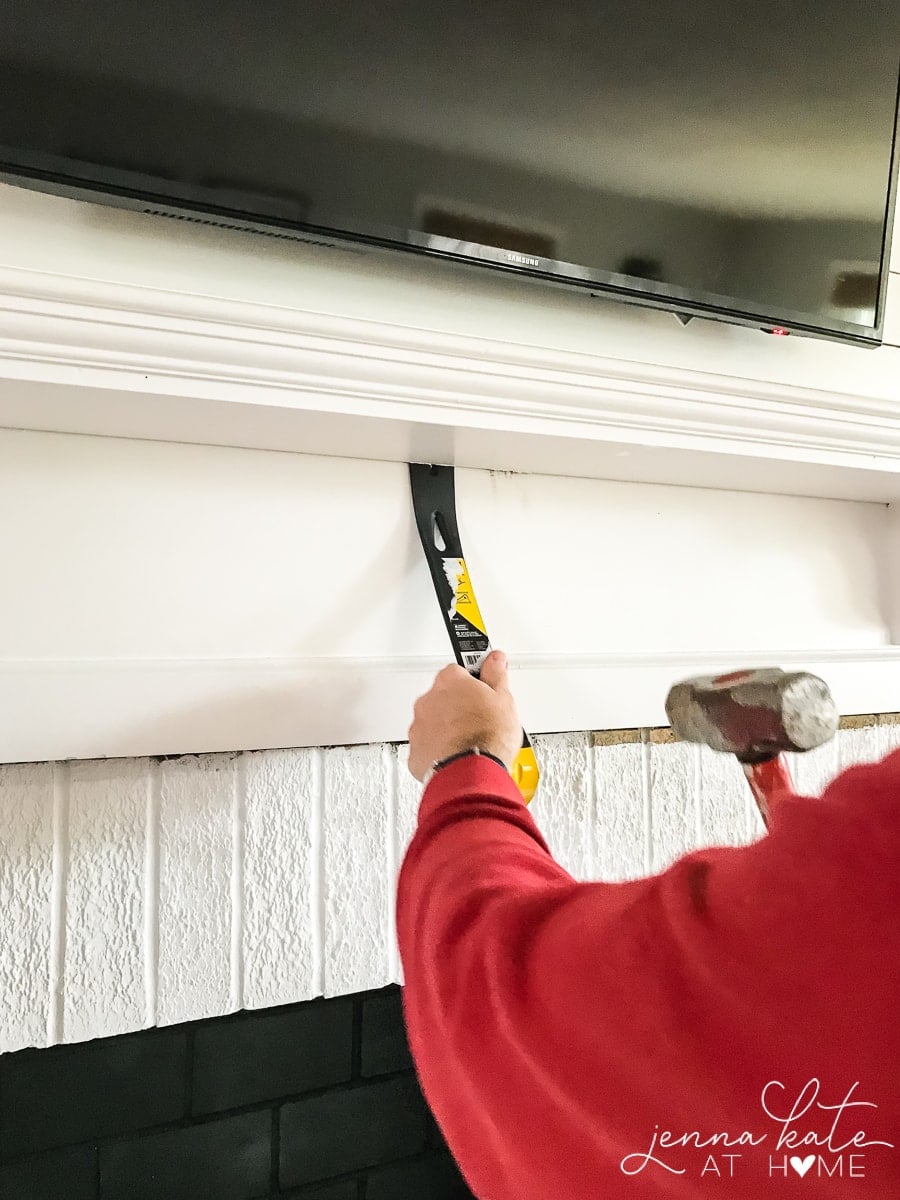
The demo portion of this makeover was minimal since the plan was to build out the surround so that it was no longer flush with the wall and then place a deeper mantel over it.
Since there’s a lot of woodwork going on on this wall, we chose to keep all the proportions (width wise) the same and just build out. That way, the the vertical board over the mantel wouldn’t look weird once it was built out below the mantel.
You don’t even know how excited I was to see that wimpy mantel shelf ripped off the wall!
Phase 2. How To Tile a Brick Fireplace
What You’ll Need
- Wet Tile Saw (we rented one at Home Depot for the day)
- Tile Adhesive
- Sponge
- Notched Trowel
- Scissors
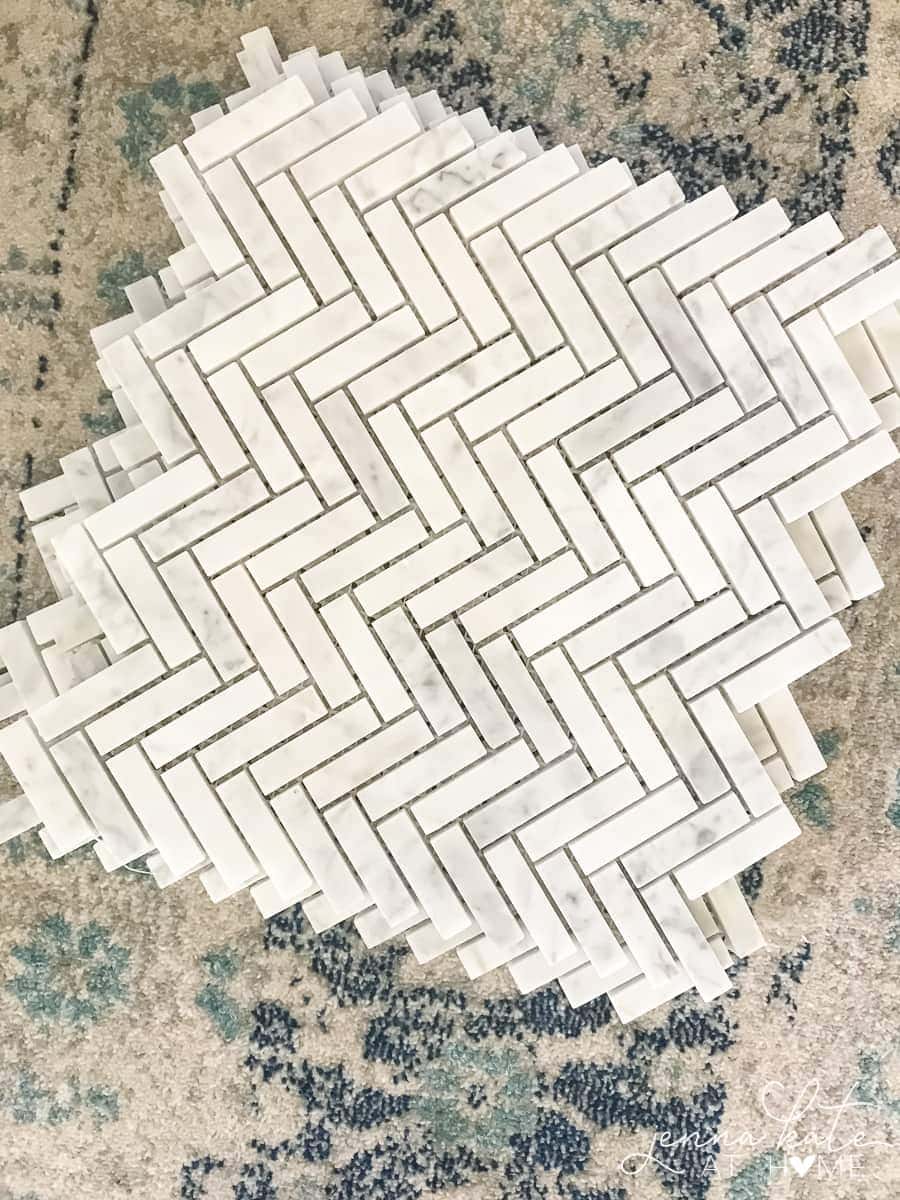
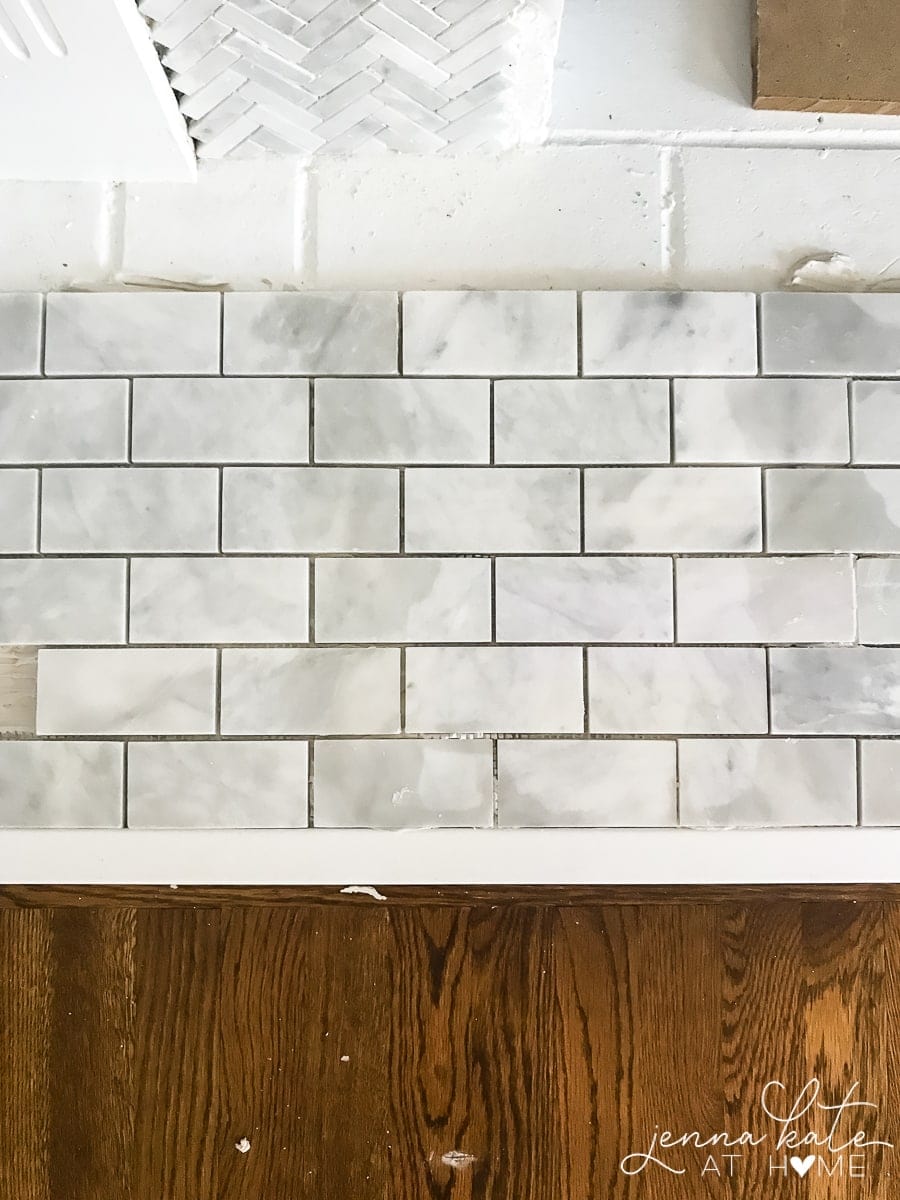
- Tile of your choosing (we used Marble Herringbone and Marble Subway Mosaic)
- White non-sanded grout
- Rubber grout float
If you love brick then you probably already hate that I painted mine. I’m not a brick fireplace lover. I’ve wanted marble on this fireplace since the day we moved in and since this is my house and not yours, I’m doing what makes me happy :-)
For the face of the fireplace I chose a small herringbone pattern marble mosaic from Home Depot. It has the perfect amount of white and gray and really beautiful.
I did rummage through about 6 different boxes in the store to pick out the sheets I wanted since some had yellows and beiges which I did not want.
This is really important when it comes to choosing marble tile. Since it’s a natural stone, there’s a lot of variation. If you don’t want those colors, you need to be careful picking it out.
We rented a tile saw for the day, also at Home Depot. We originally rented the smallest one thinking we were only cutting little sheets of marble but ended up needing the largest size to accommodate the 12 x 12 sheets.
Which was fine, it was just a pain going back and forth. Don’t be intimidated by the tile saw. It’s actually really easy to use. Before we started, we read these how to cute tile tips by Sarah of Thrifty Decor Chick which helped a lot.
I like working with these mosaic sheets because you can cover a lot of surface in a short period of time and you don’t need to use spacers. It’s easy to remove an individual piece if you need to by just cutting the backing material with a scissors.
The great thing about tiling right over brick like this is that you don’t even need to notch the tile adhesive. Because there’s already grooves in the brick, the tile adheres really well.
You don’t need a lot of tile adhesive, just enough to stick it on. Especially with these little mosaics, if you put too much adhesive on, it will come through the sides of the tile and be a huge pain to scrape out before you can grout.

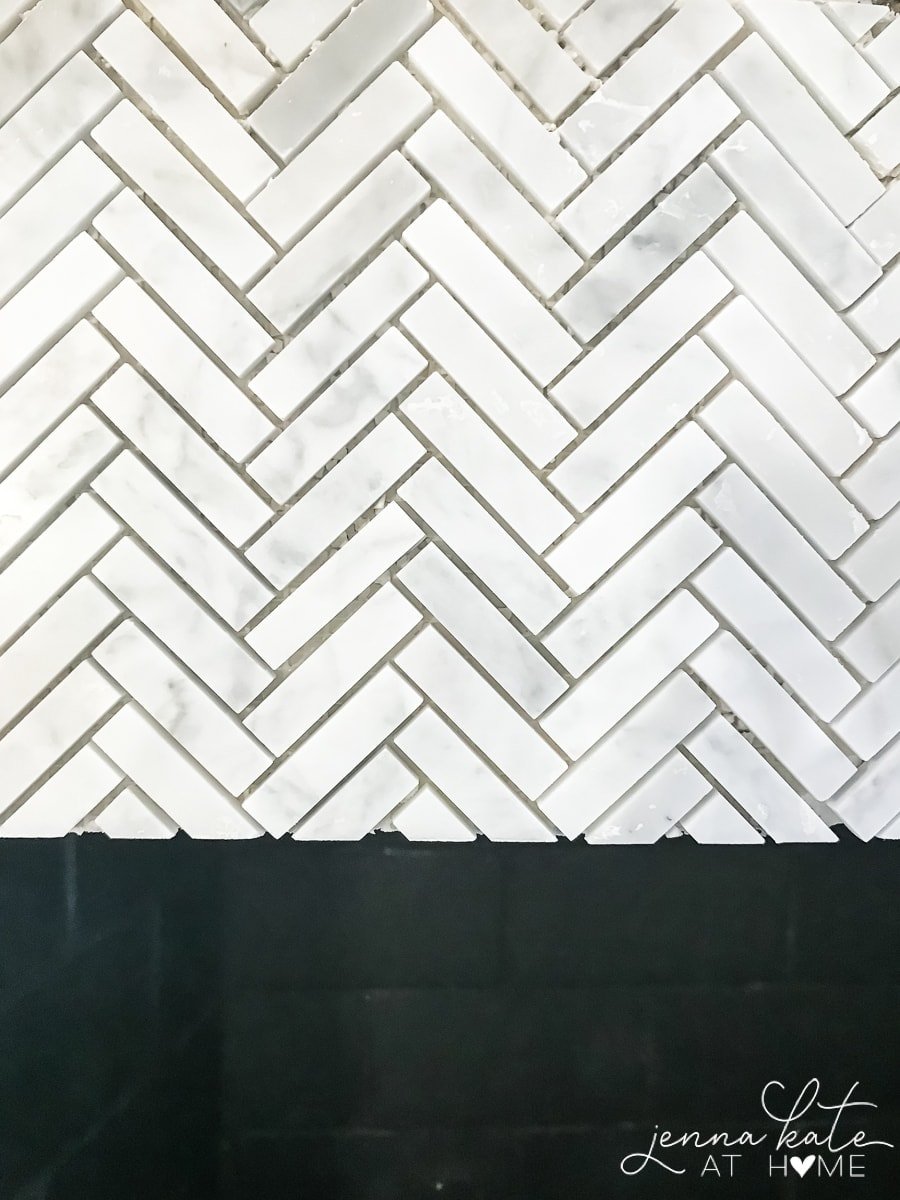
I like to make my life as easy as possible. See how I just started with one sheet of tile on the top left? I could have made a cut to the left side of the tile to start with a straight edge instead of having those little gaps.
But I knew that when I grouted everything, you wouldn’t notice them so I didn’t bother. The less cuts the better!
Now, when it came to working down the fireplace surround, we did have to cut the right side of the sheet so that we had a nice straight edge where the fireplace opening is.
But, having to only cut one side is so much easier and requires a lot less accuracy than both sides.
If you are using a straight edges tile like subway style, you won’t have this issue. But when you’re dealing with herringbone and the pattern has to match up, you need to keep these things in mind.
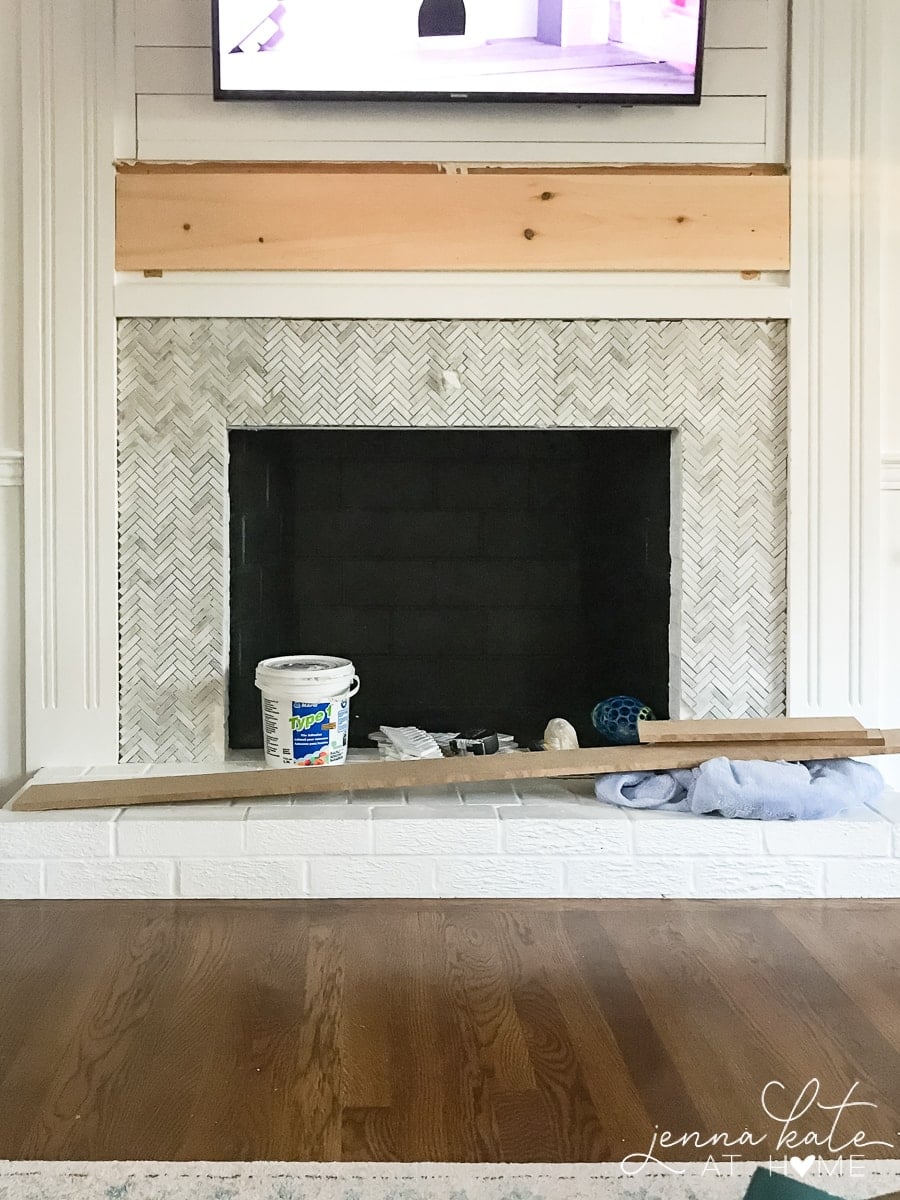
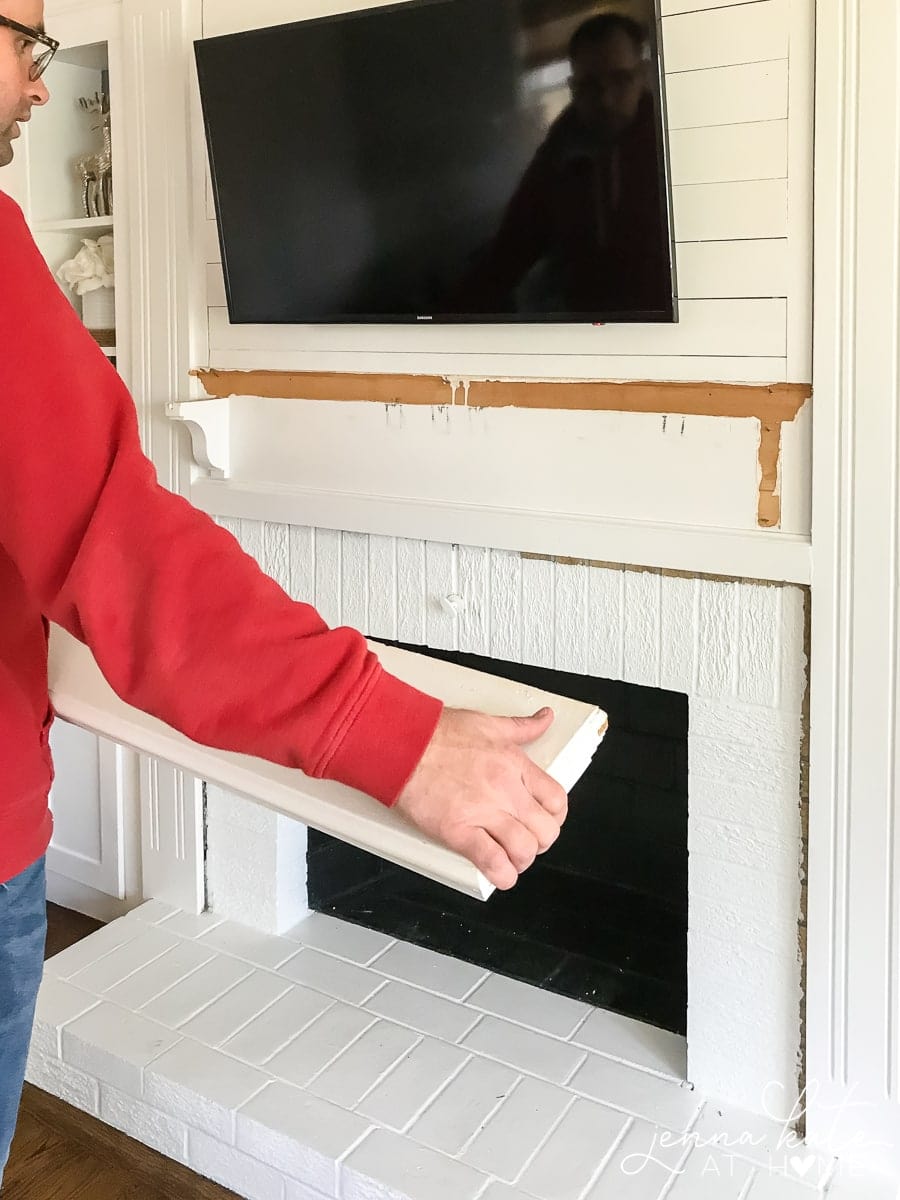
At this point, we should have added a box inside the fireplace in which the electric insert would eventually sit. Then we would have added some back board and tiled the bottom of the box.
BUT we weren’t able to get our electrician in so we ended up doing that at the very end. Luckily, the herringbone tile matched up perfectly but I would recommend doing it all in once go if you can.
Obviously, if you’re not planning on adding the electric insert you can skip this part entirely.
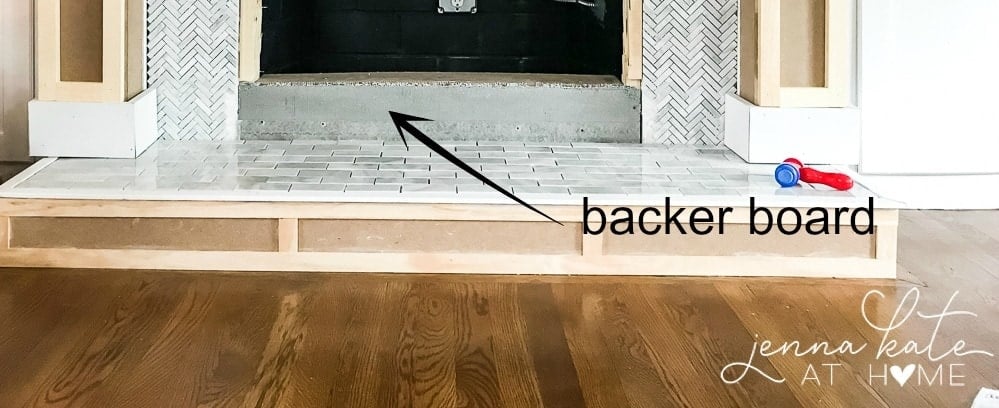
Before I could tile the hearth, we need to box it out. For this, we attached 1/4 inch stain-grade MDF around the sides using liquid nails.
Then we added some flat pre-primed molding to cover the upper seams. We attached it with liquid nails and a few nails using our nail gun, making sure it overhung the sides by a half inch, to add dimension.
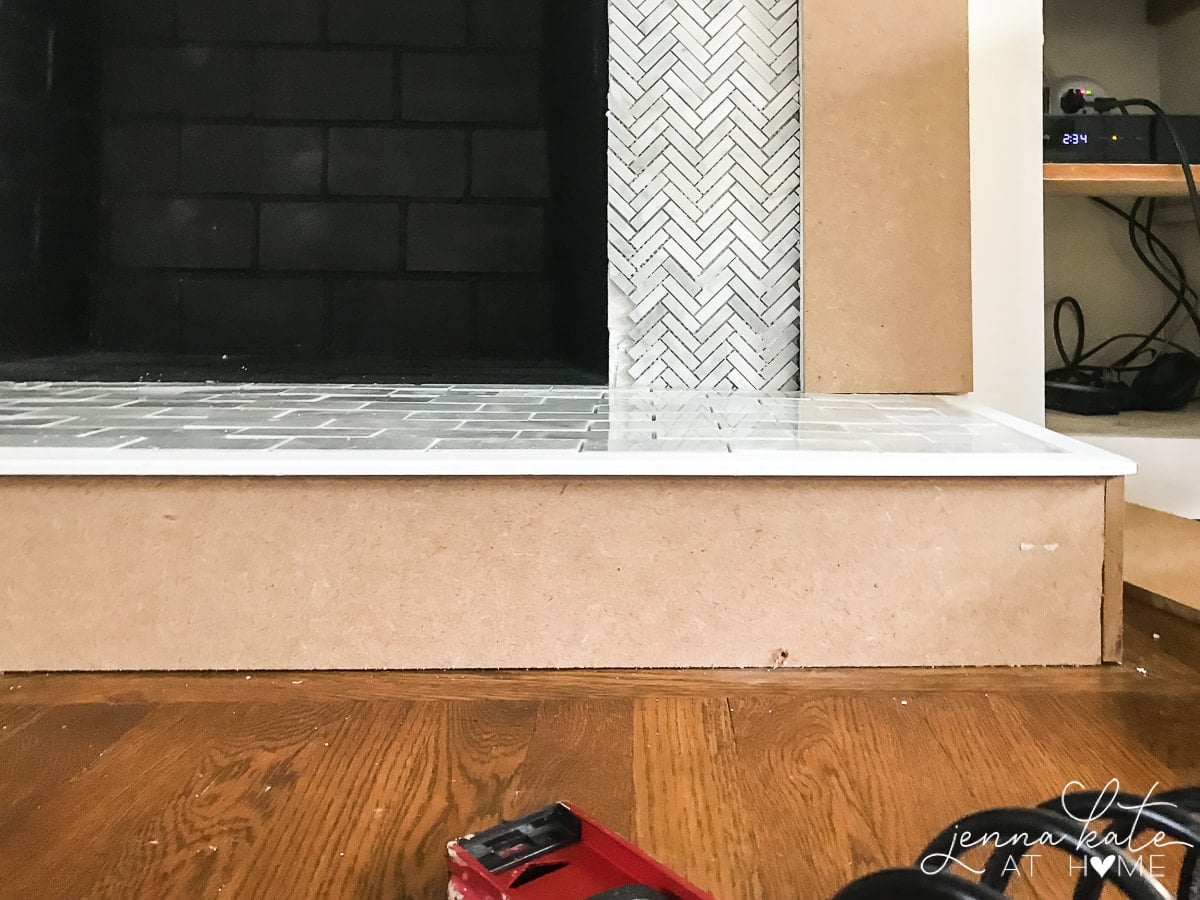
The subway marble tile sheets were so much quicker to install than the herringbone. I started on the left and worked my way across to the right and only had to make simple straight cuts.
Again, I didn’t even need to notch the adhesive since the brick has enough texture already. So I smeared a thin layer of adhesive on the brick and stuck the tile right down. Like I mentioned before, If you apply too much adhesive, it will squeeze up through the gaps.
It happened me a few times until I got the hang of just how little adhesive I actually needed. I just used an Xacto knife to gently clean out the gaps – you’ll just want to make sure there’s enough space in the gaps for the grout to fill in later.
By the way – when we are cutting tile we don’t measure anything. We use the shape of the fireplace and the surround tile as a template and just mark with a pencil. It’s not always 100% perfect, but tile is actually pretty forgiving when you’re using white grout (on the other hand, dark grout is not forgiving at all!).
Once all your tile has been adhered, wipe it down with a damp sponge to remove any adhesive. Allow the adhesive to set up for 24 hours before the next step – grout!

Grouting is my FAVORITE part of tiling. It is so instantly gratifying seeing your tile job go from “ok” to “amazing” in just a few minutes.
When choosing your grout please please don’t purchase sanded grout when dealing with small gaps and most importantly, when you’re grouting marble. Marble is very soft and the sand in the sanded grout will etch your tile and wear away the edges.
Don’t ruin all your hard work! Purchase non-sanded grout – and if you are new to tiling and it’s not 100% perfect (mine sure isn’t!) then definitely go with a white grout.
Like caulk, it hides all manner of sins! I buy powdered grout and I just follow the instructions to mix it since I always have a hard time finding pre-mixed non-sanded grout.
You want it really thick, just about spreadable. You will be cleaning off the excess grout with a damp sponge and just in case you are over-zealous with the dampness, you don’t want to compromise the grout by getting it too wet.
Overly wet grout will crack and it will ruin your entire tile job.
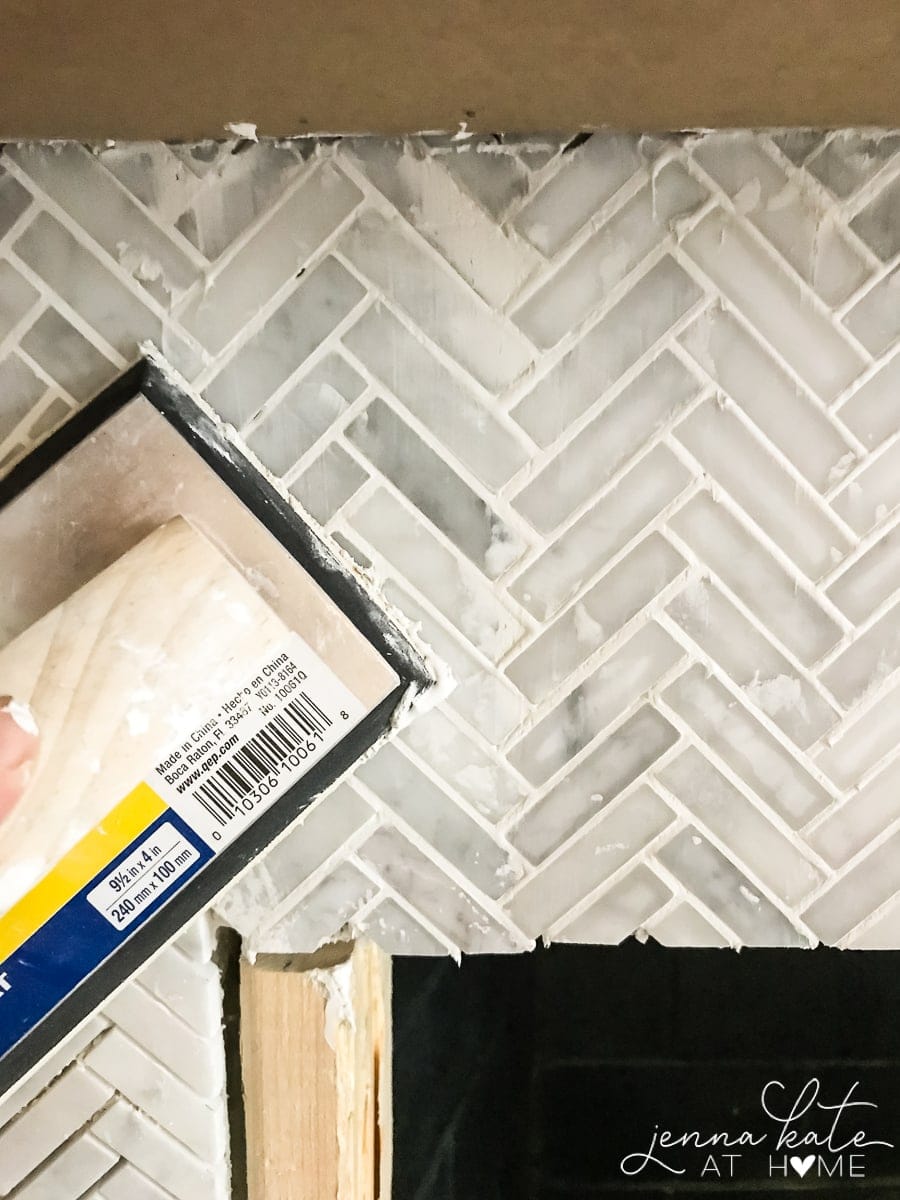
I don’t have any real technique for applying the grout – just plop a bunch of it on a rubber grout float and work it into the gaps. I move it back and forth, up and down and in a wavy motion until all the gaps have been filled. Really work it in there and push it in as you’re moving the float over the tile.
When you’re done, use a damp sponge to clean off the excess. Don’t overdo it, just remove the excess. A white haze will cover all your tile and you will work to clean that off after allowing the grout to set for a minimum of 8 – 12 hours.
The next day, once you’re happy that your grout has set up, you can use a little more water to try get the haze off. It usually takes me a good 4 or 5 passes the completely eliminate all the haze.
If it’s being particularly stubborn, I’ll mix a quarter cup of white vinegar with about 6 cups of warm water. That almost always does the trick the get rid of that last pesky bit of haze! (Don’t use vinegar on marble, as it my etch – but it’s fine on regular ceramic tile).
See how this project was finished by reading my DIY fireplace surround post.
How to Tile a Brick Fireplace
Don't get stuck with a bland brick fireplace - light it up with pretty tile work to dazzle and shine all year long.
Materials
- Tile of your choosing (we used Marble Herringbone and Marble Subway Mosaic)
- White non-sanded grout
- Tile Adhesive
Tools
- Wet Tile Saw
- Sponge
- Notched Trowel
- Scissors
- Rubber grout float
Instructions
- When installing the tile, start on the top left; cut tiles when you reach the far right.
- Smear a thin layer of adhesive on the brick and stick the tile down. Be careful - if you apply too much adhesive, it will squeeze up through the gaps. If this happens, use an Xacto knife to gently clean out the gaps - you'll just want to make sure there's enough space in the gaps for the grout to fill in later.
- Once all your tile has adhered, wipe it down with a damp sponge to remove any adhesive. Allow the adhesive to set up for 24 hours.
- Add grout to a rubber grout float and work it into the gaps. Move it back and forth, up and down and in a wavy motion until all the gaps have been filled. Really work it in there and push it in as you're moving the float over the tile.
- When you're done, use a damp sponge to clean off the excess. A white haze will cover all your tile and you will work to clean that off after allowing the grout to set for a minimum of 8 - 12 hours.
- The next day, use a little more water to try get the haze off. It usually takes a good 4 or 5 passes the completely eliminate all the haze.
- If it's being particularly stubborn, mix a quarter cup of white vinegar with about 6 cups of warm water. (Don't use vinegar on marble, as it might etch - but it's fine on regular ceramic tile).
Notes
When choosing your grout, don't purchase sanded grout when dealing with small gaps and most importantly, when you're grouting marble. Marble is very soft and the sand in the sanded grout will etch your tile and wear away the edges. Purchase non-sanded white grout.


Great article and different from the usual brick slip installation.
That being said I do love the look of a brick chamber :D
Thanks
Paul
Hi! Can you link the marble herringbone tile you used from Home Depot? We’re going to retile our surround and am trying to decide on a tile. Thanks!
Very nice, if you want to keep the look of brick, but choose your own then use brick slips- it’s almost the same process as tiling (only grout with mortar into the gaps and no wet sponge!)
Thanks,
Joe
Great job, Jenna
I will be doing this to our fireplace soon, and while reading your post I wondered if the white grout discolored after having multiple fires?
Hi Maggie, we added an electric insert so it has never been used as a real fire.
I found this article when I was trying to find some ideas on what to do our brick fireplace. Amazingly, we had already picked out the tile, which was almost exactly like yours. Thank you for helping out with my huge project (it looks amazingly like yours!). I’d love to send you pictures, but I can’t find anywhere to send them. Thanks!