Content may contain affiliate links. When you shop the links, I receive a small commission at no cost to you. Thank you for supporting my small business.
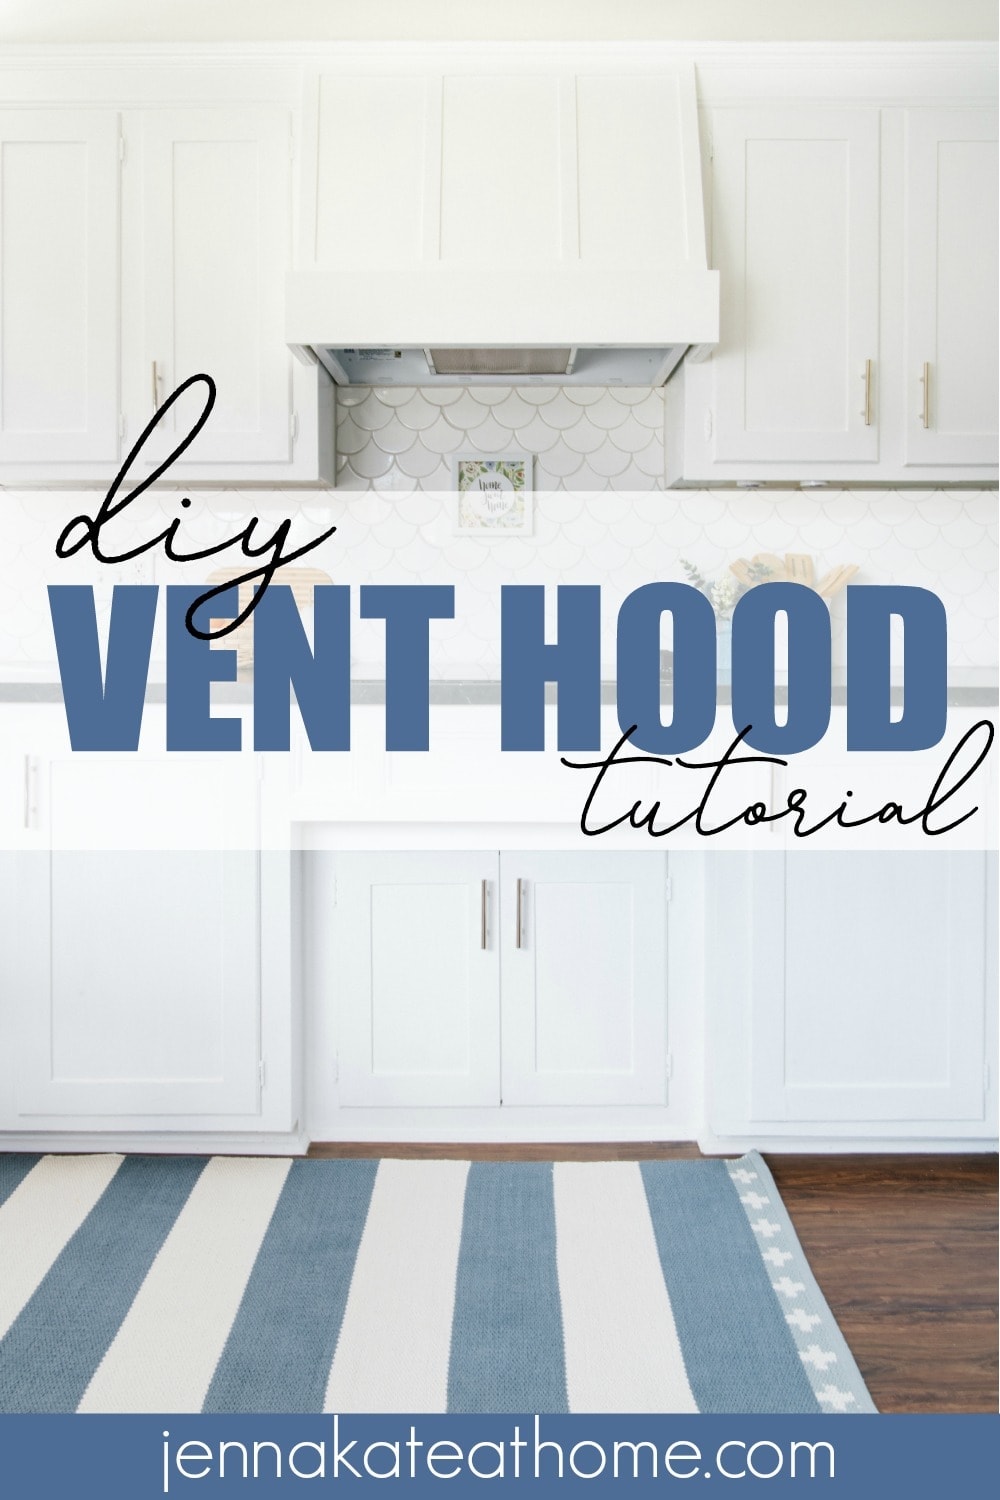
Don’t spend thousands to have a custom range hood made for you. With some spare cash and an afternoon, you can build your own DIY range hood with this simple to follow tutorial.

Looking to spruce up your kitchen without breaking the bank? A DIY range hood cover may be just the thing you need to make a huge difference.
Not only will it add a stylish touch to your space, but it can also improve the functionality of your range hood. With these easy-peasy steps, you can create a custom range hood cover that fits your kitchen’s aesthetic and stays within budget!
A big difference from what it looked like only 2 weeks ago, right? It’s a beautiful focal point I’m so glad we added in to our kitchen makeover.

What You’ll Need to Make a DIY Vent Hood
- 1 x 6 board
- 1 x 2 board
- Sheet of 1/2 inch plywood
- Lattice trim
- Nail gun and liquid nails or wood glue
- Caulk, spackle, paint
- Under cabinet range hood (this is the one we used)
It’s important to note that the type of wood you choose for your range hood cover will make a significant impact on the final product’s overall look and feel.
Some popular wood options for range hood covers include oak, maple, and cherry. These woods are durable and can withstand the heat and moisture that come with cooking.
Check Home Depot for wood and whatever else you don’t already have. Chances are, you’ve got the bulk of what you need already!
Ready to get started? Here’s the full tutorial:
1. Remove Existing Cabinets
First thing, make sure the area around your range hood is clear of any clutter or debris. This will give you plenty of space to work and help prevent any accidents or mishaps. Then, you can start removing the larger items like cabinets and microwaves.

Go ahead and remove existing cabinet doors. If you have an over-the-stove microwave, that needs to go too.
Prior to this step, we had our electrician install the ductless vent hood for us. If yours vents outside through your cabinet this tutorial will still work. Ours just recirculates back into the room.
The vent hood we chose has all the buttons underneath so keep that in mind if you’re purchasing a new one or planning on building this cover with your existing vent.
2. Make a Box Around The Vent Hood
To create a modern DIY range hood cover, you will need to start by creating the cover frame. This will be the foundational piece of your range hood cover and will hold all of the other elements in place.

Using the 1 x 6 board, measure, cut and assemble a box that fits around the range vent hood. Secure the pieces together with wood glue and nails (or screws).
We didn’t bother mitering the edges but if you want a cleaner look you can. Next time we would probably do it!

Nail or screw the box into the existing cabinets until it’s secure. We just shot it with a whole bunch of nails until it was sturdy!
3. Begin to Dry Fit The Rest of the Cover
Instead of just measuring, cutting and assembling the rest of the vent hood cover in individual pieces, we decided to dry fit everything for a perfect fit. Nothing was nailed or glued into place until we were happy with how they fit.
4. Add The Slopes
The next step is to cut the 1 x 2 boards to create slopes from the box to the top of the cabinets (or wherever you want your cover to end). These will be the support pieces for the main slab of plywood.

We chose to stop just below our crown molding. They will get nailed in once everything has been dry fitted but for now are simply resting inside the box between the vent hood and the surrounding box.
5. Cut and Measure The Front Piece of Plywood
After the slopes were in place, we measured the width of the interior of the box and the height to the crown molding to determine the size of the plywood front.

This will be a large piece of wood, so go ahead and make sure it fully covers the space it needs to, or there will be gaps.
6. Template The Triangles For The Side Pieces
Next, we angle cut triangles from the remaining plywood to fill in the sides of the hood. After some deliberation on the best way to calculate the measurements (i.e the slope) of the triangles, I decided to create a template using some foam board and it worked perfectly!
I’m a visual person so this was the best solution for me. If you’re a math whizz, go ahead and find the slope the mathematical way if it’s easier for you.

Simply start with a rectangle of foam board cut to the height of the side that you’re measuring from. Start with a 90 degree angle – use a square to draw a straight line and cut it to ensure that you’re starting off right with your template.
Then, press the rectangle on the side, making sure the plywood front is pushed securely against the slopes. Use a pen to draw a line. This will create the perfect slope for your side.

This post contains affiliate links for your shopping convenience.
Cut out your template, then transfer it to your plywood. We used our Dremel Velocity with a wood blade to easily cut out the triangles.
7. Nail Everything in Place
Once we were happy that all the pieces fit together well with no crazy huge gaps we were ready to nail everything in place (little gaps that can be filled with caulk are fine just keep them as small as possible).

The left and right slopes were pulled to the edges so that the triangles could be nailed into them. We first nailed each one on the top into the cabinet.
Then the triangles were put in place with some liquid nails as well as nailing them into the slopes from the side. The middle slope is only nailed in on the top and rests inside the box quite snuggly.

The front piece of plywood was then slid into place and nailed into the three slopes as well as along the top where it meets the existing cabinet.
8. Add Trim For the Finishing Touch

Finally, we trimmed out the front panel with lattice trim for a custom look. The trim pieces add that extra sparkle! You can do any design you want here – three boxes are traditional but a “x” design looks really cool, too!

9. Caulk, Spackle, Prime and Paint
Once the vent hood cover was built, it was time to do all the little things that make it look clean and professional.

All the nail holes were spackled, allowed to dry and then sanded smooth. Seams and gaps were filled with caulk. Finally, a coat of shellac-based primer was painted on followed by 2 coats of semi-gloss white paint.
Final Thoughts
That’s it! It’s a very do-able afternoon project that makes a huge impact to the kitchen, don’t you think? You’ll feel like an interior designer in no time!
Just remember, there are many ways to customize your range hood cover. You can choose different types of wood, contrasting paint colors, and designs to match your kitchen decor. You can also add some extra features such as lighting or a fan to make it even more functional.
Your new range hood cover will not only look great but also serve its purpose of keeping your kitchen free from smoke and odors.

Range Hood Cover
Don't get stuck with boring, ineffective tools in the kitchen - upgrade your range hood and do it with style!
Materials
- 1 x 6 board
- 1 x 2 board
- Sheet of 1/2 inch plywood
- Lattice trim
- Under cabinet range hood
Tools
- Nail gun and Liquid Nails or wood glue
- Caulk
- Spackle
- Paint and primer
- Foam board (for creating a template)
- Dremel Velocity saw with wood blade
Instructions
- Remove existing cabinet doors and over-the-stove microwave, if you have one
- Make a box around the vent hood with a 1 x 6 board. Measure, cut and assemble the pieces, fastening together with wood glue and nails (or screws). Then, nail or screw the box into the existing cabinets until secure.
- Form the slopes by cutting the 1 x 2 boards to create an angle from the box to the top of the cabinets (or wherever you want your cover to end).
- Measure the width of the interior of the box and the height to the crown molding to determine the size of the plywood front.
- Template the triangles for the sides with foam board. You can also do it mathematically but this is also an easy way to visualize it. Start with a rectangle of foam board cut to the height of the side that you're measuring from. Begin with a 90 degree angle - use a square to draw a straight line and cut it to ensure that you're starting off right with your template. Then, press the rectangle on the side, making sure the plywood front is pushed securely against the slopes. Use a pen to draw a line, cut out your template, then transfer it to your plywood.
- Nail everything into place. Pull the left and right slopes to the edges so that the triangles could be nailed into them. We first nailed each one on the top into the cabinet. Then the triangles were put in place with some liquid nails as well as nailing them into the slopes from the side. The middle slope is only nailed in on the top and rests inside the box quite snuggly. The front piece of plywood was then slid into place and nailed into the three slopes as well as along the top where it meets the existing cabinet.
- Add trim to the front panel with lattice trim for a custom look. You can do any design you want here - three boxes are traditional but a "x" design looks really cool, too!
- Add the finishing touches. Apply spackle to the nail holes. Allow to dry, then sand smooth. Fill in seams and gaps with caulk. Finally, add a coat of shellac-based primer, followed by 2 coats of semi-gloss white paint.
Notes
Instead of just measuring, cutting and assembling the rest of the vent hood cover in individual pieces, we decided to dry fit everything for a perfect fit. Nothing was nailed or glued into place until we were happy with how they fit.
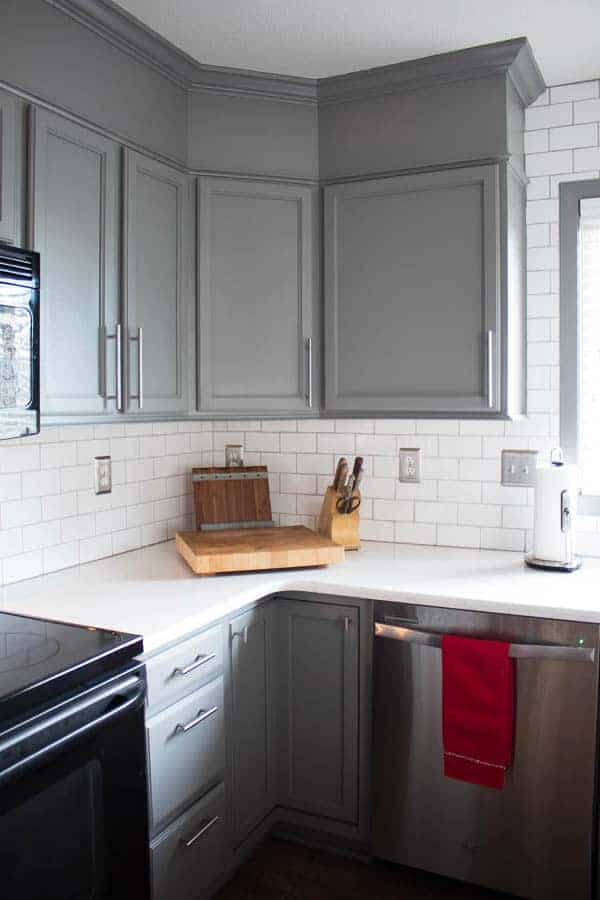
How do you access the switches to turn on the fan and light?
All the switches underneath are completely accessible.
Hello! I have been wanting to do this project for a while, but my husband is reluctant that we might not be able to access the electrical outlet for the hood incase there’s a need. How would you tackle that problem?
I just looked at your post about the white quartz countertops because that’s what I think I want. I then clicked on the post about building the range hood cover, and saw black countertops and different tile backspace. Which kitchen do you have now? It’s confusing.
The black countertops are from our original kitchen. They are laminate. When we remodeled we did quartz.
Loads of great ideas here! Keep sharing stuff like these!
I’m curious about your ventless hood? I had one and over the years, the grease just got all over my cabinet doors around the range area. I mean thick grease. I finally had a vent put to the outside, cleaned my cabinets with GooGone (that’s how bad the grease was) and the outside vent has made an amazing difference. No more grease on the cabinets and less on the stove itself. Having said this, my old microwave/vent was 10 years old. Is there newer technology?
This one is quite powerful. We had one in our old house and never had an issue with it. As long as there’s a good filter it should work. With that being said, vented is always better and we will convert when we eventually gut our kitchen